Saturday 31 May 2014

Crazy 4 Challenges Summer Themed Stand-up Card with Purple Onion Design stamps

I have another Crazy 4 Challenges card for you today - this time using the theme of 'School's Out' - and your plans for the summer... my plans (after I have finished running a camp for a bunch of girls from my church) are to go to France, and spend some time at the beach - reading, picnicking and surfing!
What are your summer plans? Can you represent them in a card?!

I chose to use a Sizzix Stand-ups card, and some Purple Onion Design stamps.
The wave die is from the Stamps of Life, and the Birthday die is by Marianne Designs.

I am really into stamping images onto patterned paper at the moment, then adding some detail with Copic pens. Here I used mainly Simple Stories' Vintage Bliss papers, and a very pretty floral one - Crate Paper's Close Knit 'Seamstress'.

Some of the products used:


Wednesday 28 May 2014

Elizabeth Craft Design May Designer Challenge Card

The Designer Challenge for the Elizabeth Craft Design Team this month, is to create a flat card - as in no Pop-ups this time! 

I used a linen textured background card, and made a blue frame using the Oval Flourish Frame Edge dies.
I used the Oval Accordion Card die to create the inner coral oval, by snipping off the tabs which attach it to the rest of the panel.
I cut four rose leaves from the Rose die set, and in the top left hand corner, layered two of these with a Tim Holtz Crinkle Ribbon bow (which I coloured in with the same Copic pen as I used for the central roses.)
For my sentiment, I stuck a die cut 'Hello' onto a small rectangle of clear acetate with a glue pen, and then glued this to the bow. (I thought the acetate would make the word die cut a bit more stable.)


For the centre of the card, I used a Roses in Oval peel-Off Sticker, coloured it with Copic pens and cut out by hand.
Lastly, I added the other two rose leaves, and a layered butterfly in the bottom right hand corner, and a tiny layered butterfly (from the Butterfly Pivot Card set) to the top left.


Products used:


Saturday 24 May 2014

Elizabeth Craft Designs Pop It Ups Birthday Card Tutorial

Hello! Here's a card of mine, and the tutorial for it, which are on the Elizabeth Craft Designs blog today. I really liked these gift peel-offs, and combined them with glitter and Copic colouring, in a pop-up card...

SONY DSC

Directions:

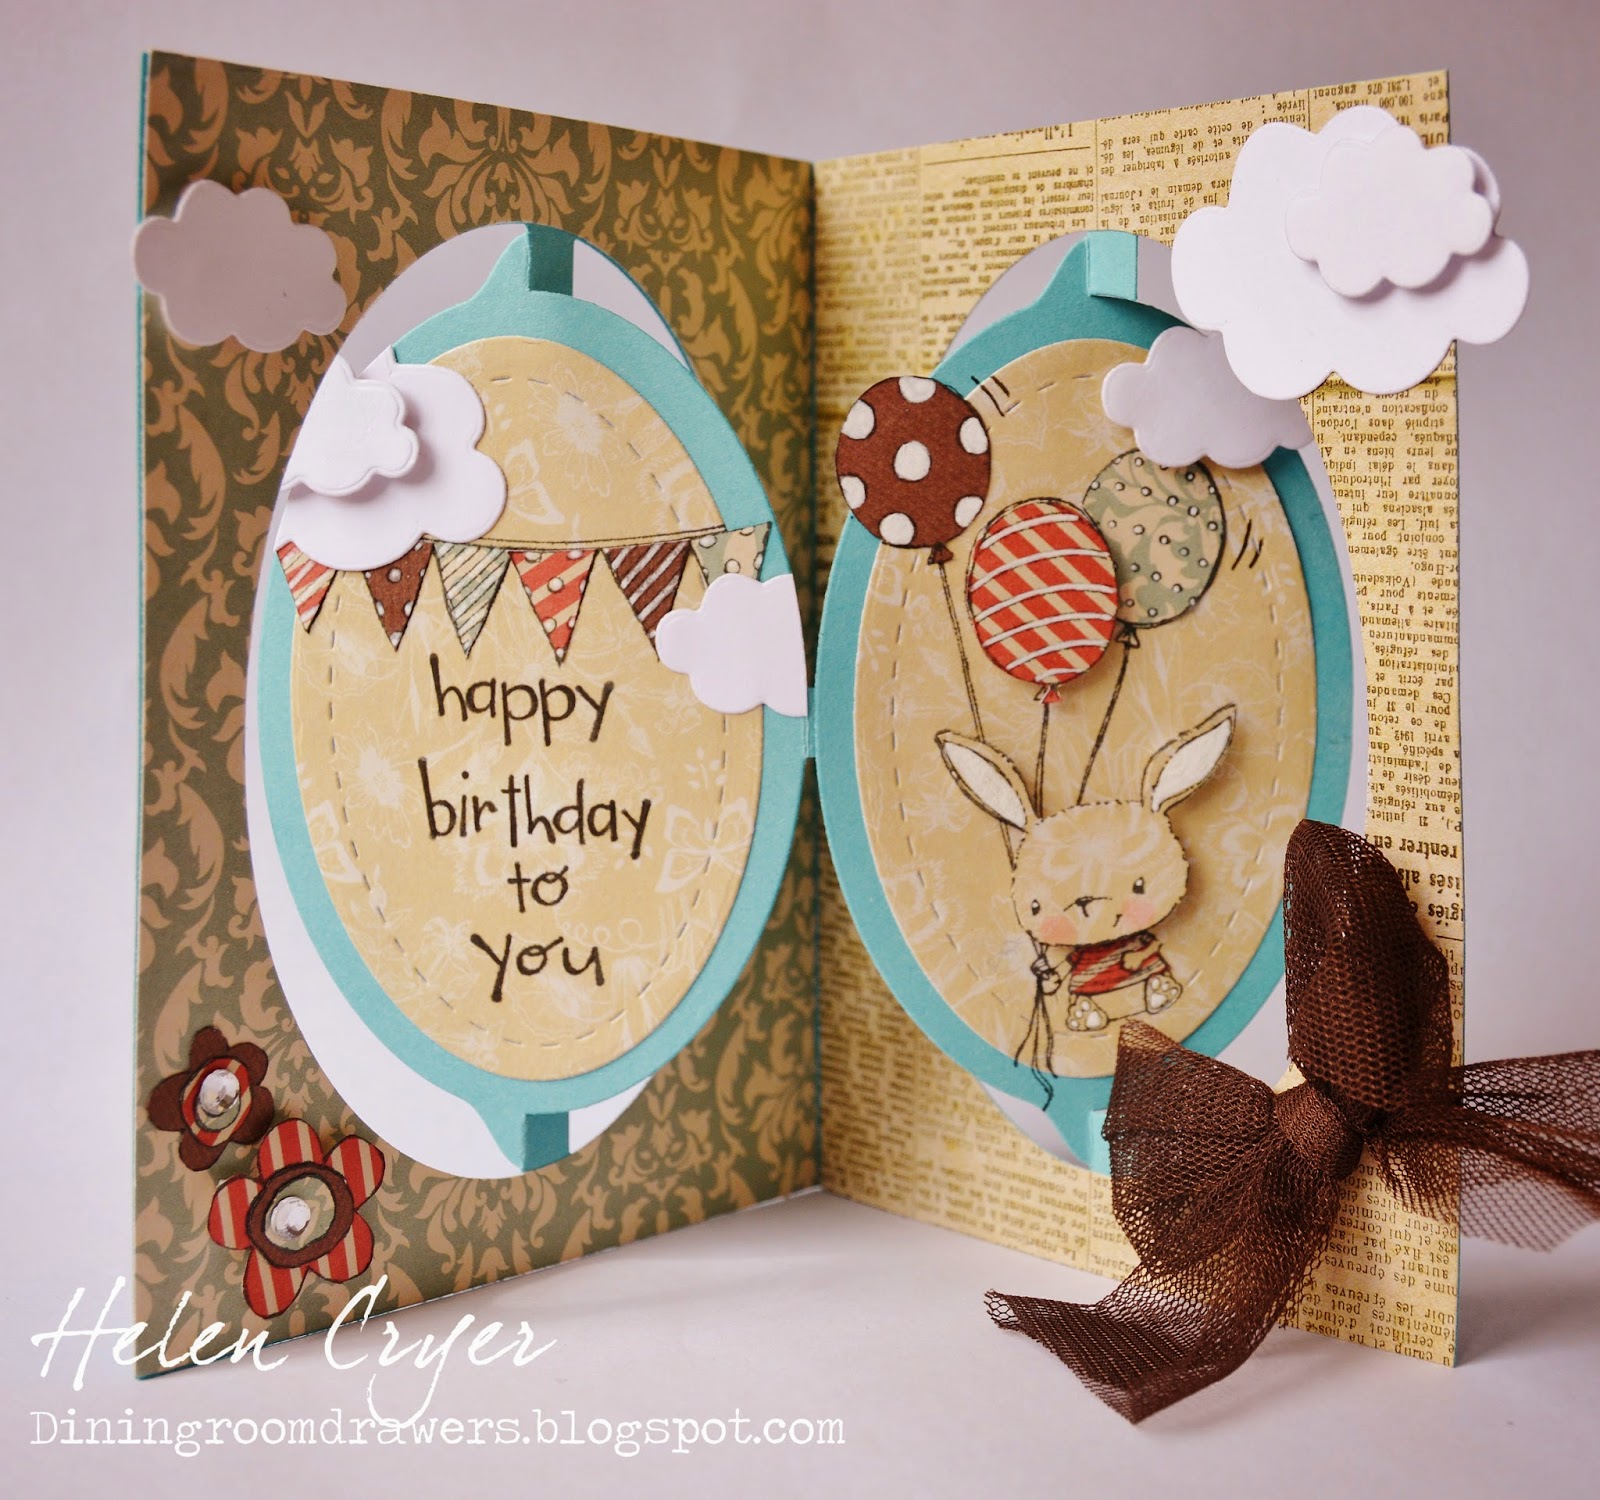
1. Cut a piece of bright pink cardstock to approx. 10.5'' x 4.5''. Put a crease across the middle.

2. Cut a piece of pale pink cardstock to approx. 4 3/8'' x 6''. Put a crease across the middle.

3. Die cut the pale pink cardstock with the Lucy Label Pop Up die, and emboss it with the Lots of Dots Embossing Folder.

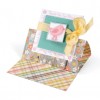
4. Adhere the pale pink cardstock piece inside the bight pink cardstock piece, as pictured above.

5. Adhere two thin strips of pale pink cardstock (4.5'' x 0.25'') to near the top and bottom borders of the card, and adhere two 4.5'' lengths of black ric-rac, overlapping the pale pink strips slightly.

6. Adhere a 4.5'' length of bright pink pom pom trim, just below the ric-rac nearest the top of the card.

7. Die cut 'Happy Birthday' from black cardstock, and adhere to the pom pom trim.

8. Add a strip of Ribbon Flowers Peel-Off Stickers, just above the pale pink cardstock, as pictured below. Add adhesive gems to the centres of the flowers.

SONY DSC

9. Cut a white cardstock label from the Lucy Label decorator dies, and adhere to the Lucy Label Pop Up.

10. Use three of the Gifts Peel-Off Stickers, and glitter them, colour them, and cut them out, as shown by Els in this tutorial. Attach them as shown above to the pop-up parts of the card.

11. Add the negative parts of the three Gifts Peel-Off Stickers, using Transfer Sheets, with the method shown in this tutorial.


Some of the products used:


Crazy 4 Challenges Purple Onion Flip-its Card

There is a colour challenge this week at the Crazy 4 Challenges blog: Use Orange, Turquoise and Kraft.

I used a kraft card stock Flip-its card, with patterned paper layers from Crate Paper's Story Teller 6x6 pad.
The stamps are all from Purple Onion Designs

For the bear's T-shirt and the bunting, I stamped onto patterned paper, cut out the pieces and used a glue pen to stick them on. I then added a few details with Copic pens, and White Uniball pen.
Why not join in the challenge?! I would never have thought of using this colour combination, but like how it turned out - I think that's the reason I love participating in challenges!

Some of the products used:


Tuesday 20 May 2014

Karen Burniston's Pop it Ups Oval Accordion Card with Purple Onion stamps

I wanted to share with you another card on the theme of 'Fly', which is this month's Designer Challenge from Karen Burniston.
I used the Accordion Oval Card die set for the card base and ovals with stitches, plus clouds from the All seasons Tree set.
The stamps are all from Purple Onion Designs.

Purple Onion Designs recently released a new Stacey Yacula collection of stamps which is mainly what I used here. If you haven't seen them already, I would recommend having a look at them - they are just gorgeous!!
I stamped and cut out various parts of the design to layer up, then coloured some of the details with white Uniball pen.

The papers are all from Dovecraft's 'Curiosity Corner' 6x6 pad.


Links to some of the products used:


New dies at The Stamps of Life

 There are two new die sets being released at The Stamps of Life today!
The first is a die which perfectly cuts out the lovely frame from the already existing sign4words stamp set.

Here, I used the new die on the front of he card, and stamped the frame inside the card. the die set also comes with a perfect sized rectangle for inside the frame.

The second set of dies being released today is the Large Flower set, which comes with six really versatile flower/scallop dies.

Some more of the products used:


Monday 19 May 2014

Karen Burniston's Pop It Ups May Designer Challenge Butterfly Pivot Card

 Karen Burniston's Designer Challenge on the Elizabeth Craft Designs blog for this month is 'Fly' - however we want to interpret it! I have probably gone for the least original option, but I've had the thought of wanting to make the Butterfly Pivot Card die into the centre of a swathe of butterflies for a while now, so here's my card.


I just started with a plain pink cardstock background, with plain pink strips down the back/front of the card to infill the gaps created by the Butterfly Pivot die.
I added border strips of patterned paper with shaped edges, and swirls from the Agatha Edges set.
I then cut out loads of varying sized butterflies using the Butterfly Accessory Dies set, and glued them all ove the place!

The front is just a continuation of the inside theme, with a sentiment stamp.

When I was sticking on the butterflies, I added a few extra ones to the pop out butterfly parts too. You might be able to see them slightly better here.

Some of the products used:


Saturday 17 May 2014

Crazy 4 Challenges Sketch Card

We have a sketch for you at Crazy 4 Challenges today, and here is my card based on it.
I turned the sketch on its side, and used some of my favourite colours and textures.


I used a die and stamp set from Marianne Designs, and resin roses from Dovecraft.

Here's the sketch, if you fancy a go at it!


Links to some of the products used:


Monday 12 May 2014

Elizabeth Craft Designs Nesting Dolls Oval Accordion Card

Hello everyone! I'm on the Elizabeth Craft Design Blog today, sharing with you an accordion card. Ever since I first came across Elizabeth Craft Designs, I had my eye on the Nesting Doll Peel-Offs, thinking that they would be fun to have a go at colouring one day. Well, I finally got round to it, and thoroughly enjoyed myself!
SONY DSC
Directions:
1. Cut out some double-sided adhesive, large enough for a nesting doll peel-off, and stick one side of it onto white card stock.
2. Stick a nesting doll peel-off sticker to the other side of the double sided adhesive.
3. Cover the nesting doll and adhesive with Cool Diamond Microfine Silk Glitter, and rub in.
4. Colour the nesting doll with Copic pens, and add highlights with White Enamel Accents. Set aside to dry.
5. Cut out the nesting doll.
6. Use the Accordion Oval Card die set, and Oval Flourish Frame Edges to cut out the pieces as shown below. For the gingham frames, cut out  full Accordion Oval panels, snip out the centre parts, and trim off extra tabs.
7. Also die cut a ‘Get Well Soon’, two of the smallest leaves from the Triple Leaf set, and a heart which is also from the Accordion Oval Card die set.
SONY DSC
8. Adhere the Flourish Frame edges with a glue pen, and adhere the rest of the big pieces with a glue runner.
9. Adhere the words and leaves with a glue pen, and the doll and heart on foam pads.
SONY DSC
10. Finally, add some more White Enamel Accents in between the die cut stitches on the turquoise oval panel.
SONY DSC
I hope you have enjoyed this card! Why not have another look at Elizabeth Craft Design’s wonderful range of Peel-Off Stickers, and see if any catch your eye?!
Links to some of products used:


Wednesday 7 May 2014

The Stamps of Life new release cards

Well today sees the release of some new stamps sets at The Stamps of Life, including the one I used here - patterns4sandals. The club set flipflops2stamp/sandals4summer was released last week, and this new set co-ordinates wonderfully with it!

For my first card, I used the accompanying dies, and a sentiment from patterns4sandals.

My second card is a Stand-ups card, using some of the the great patterned flip-flop stamps.

Fun zebra-print flip-flops!

And lastly a Flip-its card, with my favourite sentiment from the set!

Some of the products used:


Monday 5 May 2014

Crazy 4 Challenges Flowers Thanks Card

This was my card for the Crazy 4 Challenges 'Flowers' challenge this weekend.
I made flowers using The Stamps of Life Mini Flower Dies set, as well as brads from there, and the 'thanks' dies are also by Stephanie Barnard, as part of the Elegant Stand-Ups Framelits die set.
They are all just popped up on foam pads.


Some of the products used:


Thursday 1 May 2014

New May Club Stamp set from The Stamps of Life

 The Stamps of Life club set this first of the month is such a fun set! It's called flipflop2stamp, and comes with a great pair of flip-flops and lots of summery/beachy accessories (one of my favourites being the lovely little starfish, which seemed to sneak its way onto every card!)

Here's my first card, using the Square Framelits Flip-its die for the card and layers, and the new dies which accompany the sandals4summer set, including those great waves!
 And the flip side of the card...

I made use of the waves again for my second card, plus used one of the Talk Bubble Dies.

And lastly a really simple one...
You can check out more ideas in the gallery for flipflop2stamp.

Links to some of the products used: