Thursday 31 January 2013

Stampin' Up Thank you Card

DCM's challenge this week is to have a scene on your card.
I used Stampin' Up's flag stamp (from 'Party this Way' set) and matching punch, scallop border punch, card stock and ribbon. The cloud dies are from Papertrey Ink.

Monday 28 January 2013

Portrait Painting

I received a wonderful gift this morning, from a lady who I visit through my church. I went to see her, and she gave me this painting, of myself and husband, which she had copied from a photo I had on Facebook. She is so clever! I was so so touched, and really can't quite believe someone has gone to all this effort for us.
It's also lovely that the picture is a memory of a brilliant day we had as a family, last December. We were huddled up in the cold, on a train station platform, waiting for the train to London, where we had decided to go on the spur of the moment.

Wednesday 23 January 2013

Copic and Sizzix Movers & Shapers Card

 The challenge at 'Less is More' is to make a card on the theme of Friendship. I don't have any specifically Friend themed stamps or anything, but thought that what I would say most often to friends in a card, is Thank You...
I'm also not that used to making such a plain card, as 'Less is More' requires, but like how this card turned out. I coloured a strip of card with Copic markers, and attached it to a blank card, then used the Sizzix Movers and Shapers base tray to cut out the butterfly. I machine sewed the white cotton trail of the butterfly.
I got the idea for the Copic coloured strip from a card which I saw on Pinterest. The original is here.

Belated Birthday Card

The challenge at Crafty Cardmakers was perfect - to make a belated birthday card - exactly what I needed to make today, for Scott's Aunt.
I used a Gorjuss stamp coloured with Copic pens, Stampin' up card stock and ribbon in Chocolate Chip, and white card cut from Tom Holtz's Sizzix 'Baroque' die. I coloured some paper roses and adhesive pearls with the same Copic pens I used for the dress. (RV 91, 93, 95 & 99), also used a Martha Stewart leaf punch, and an old Cuttlebug corner die.

(Later)
Yay!

Monday 21 January 2013

Copic Colouring

I've been really enjoying colouring stamped images with the Copic marker pens I got just before Christmas... I need to start incorporating them in cards now!

Papertrey Ink Thank You Card

A card made using the Mojo Monday card sketch, and also incorporating DCM's challenge to use some embossing. 
I used Papertrey Ink's 'Hanging by a Thread' stamp set and matching die cutter, and the embossing folder and background paper from Papermania's 'Happy Days' range.

Papertrey Ink Cards

I have seen Papertrey Ink products around for a while, and now thanks to an American friend, have some myself! I made this card using the Stitched Elements stamp set, and ruffled ribbon from Stampin' Up.
The Shabby Tea Room card challenge is to make a card based on pink and white, with flowers and stripes, so this is my version.
 This card was made using the Fly Away stamp set and matching dies, coloured with copic markers


Monday 7 January 2013

'Wonky Star' Quilting Block Tutorial

It's the last day before the kids go back to school, and I'm having a bit of a clear-up, including putting the Christmas decorations away (finally), and finishing sewing together the bits of this quilt which have been floating around my sewing desk for a couple of months.
I thought I'd do a tutorial for how to make a really simple 'Wonky Star' block:

Each finished block measures 12.5'' (12'' once sewn together)

1. I started off with 9 x 4.5'' squares, and 8 rough triangles. I just cut the triangles (my star points) anyhow - I don't want them to be the same size or shape as each other (though you could just cut 4 x 4.5'' squares diagonally in half to get the triangles). As long as the bottom of each pair of star points will be more than 4.5'' wide.

2.  I take one of my outer squares (right-side-up), and lay a triangle wrong-side-up, on top of it.

 3. Flip the triangle over, holding about 1/4'' in place - this is just to check that when you sew the triangle onto the square, it will cover all of the corner of the square, and make a good star point. (See how you can't see any of the fabric square sticking out in the bottom left-hand corner.)

 4. When the triangle is in the right place, flip it back, and sew along the long edge of the triangle, with a 1/4'' allowance.

5. Do the same for 3 more of your outer squares. I work on one side of each star first, so that I can chain piece them.

6. Cut off the sticking out corners of the squares.

7. Iron the seam allowance to the dark side.

8. Take one of your squares with half a star sewn on, and lay it right-side-up. Lay another triangle, wrong-side-up, on top of it.

9. Like you did before, just flip the triangle back over (holding about 1/4'' in place), just to check that once sewn on, the triangle will look right, and cover all of the bottom right-hand corner of the square underneath. Flip triangle back, and sew into place, as before.

10. Do this for all four. (Here they are, chain-pieced again)

11. Cut off the sticking out corners again, 1/4'' from the seams.

12. Open out the newly added triangle, and iron the seam allowances to the dark side.

 13. Here is the back with the seam allowance pressed to the side of the darker fabric. (This is just so that you see as few seam allowances through the lighter fabric, from the front, as possible.)

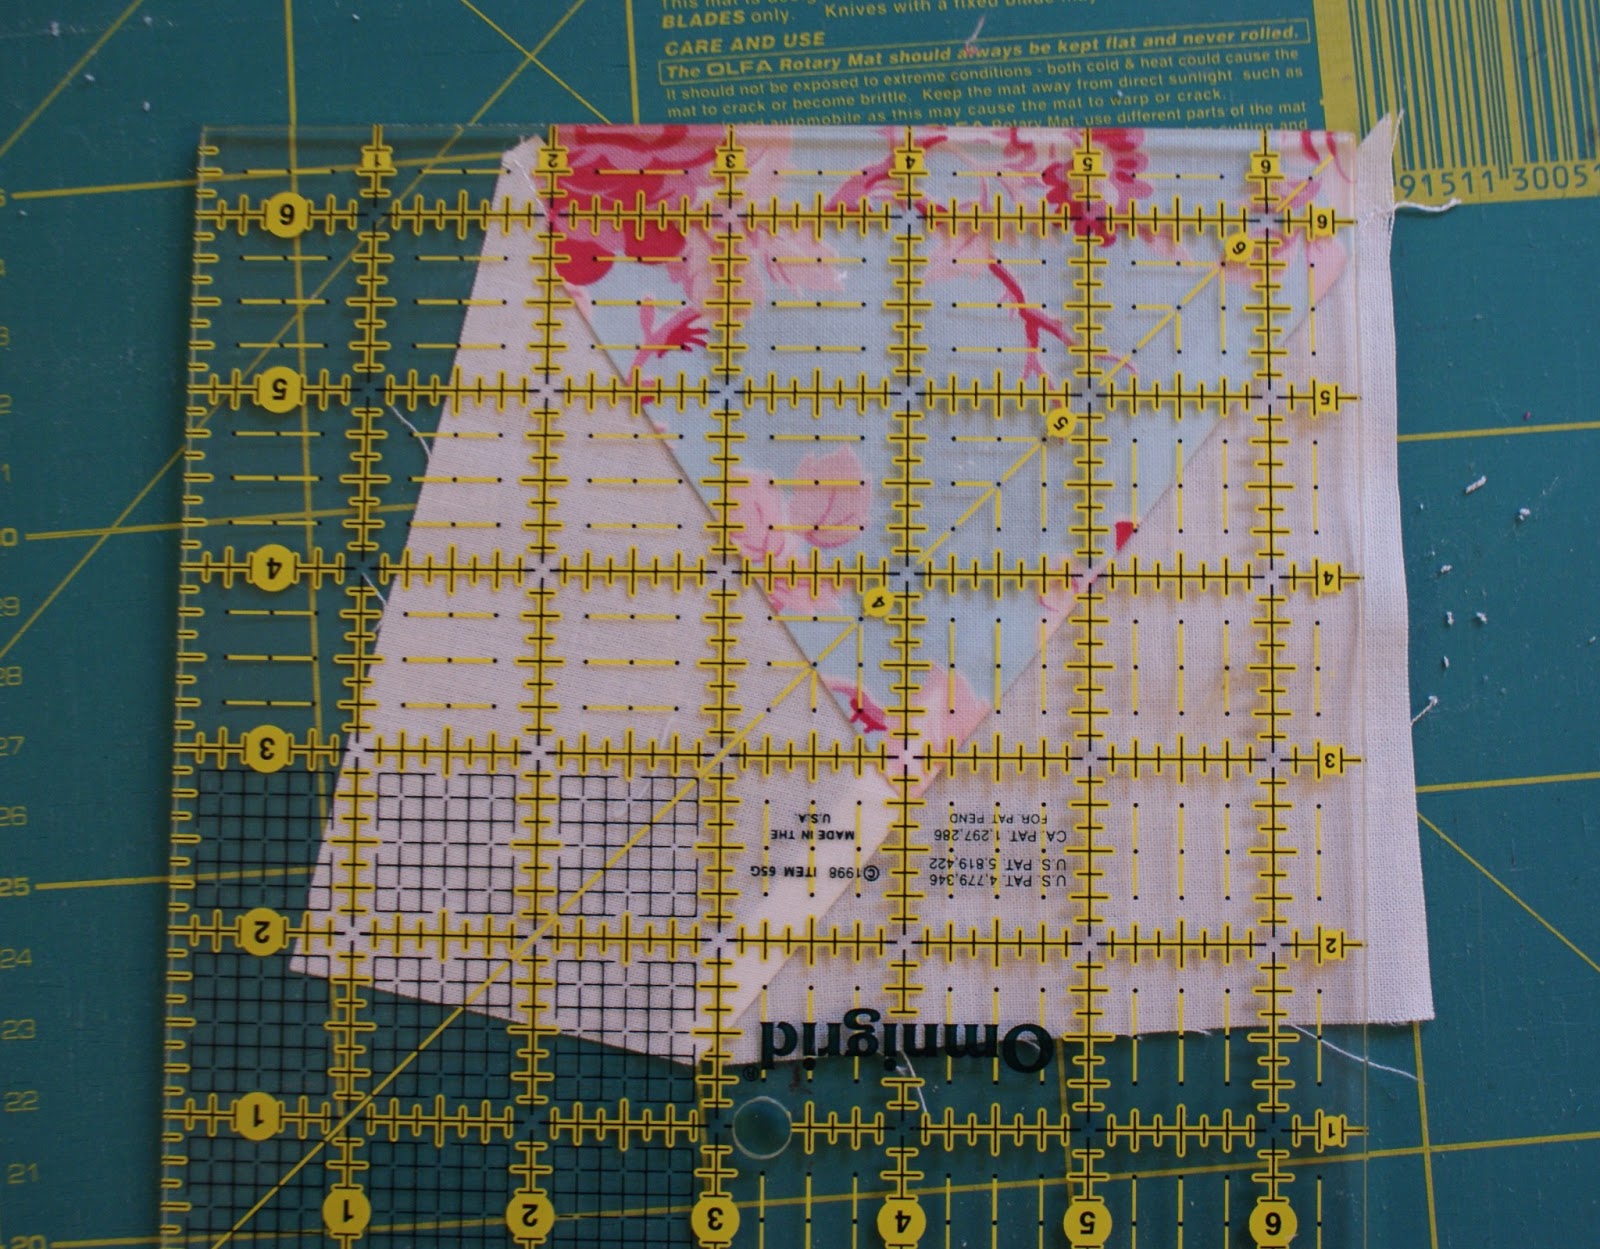
14. Cut down to a 4.5'' square again. I line my ruler up to the top edge of my original square fabric.


15. Swing the piece round and cut the other edges.

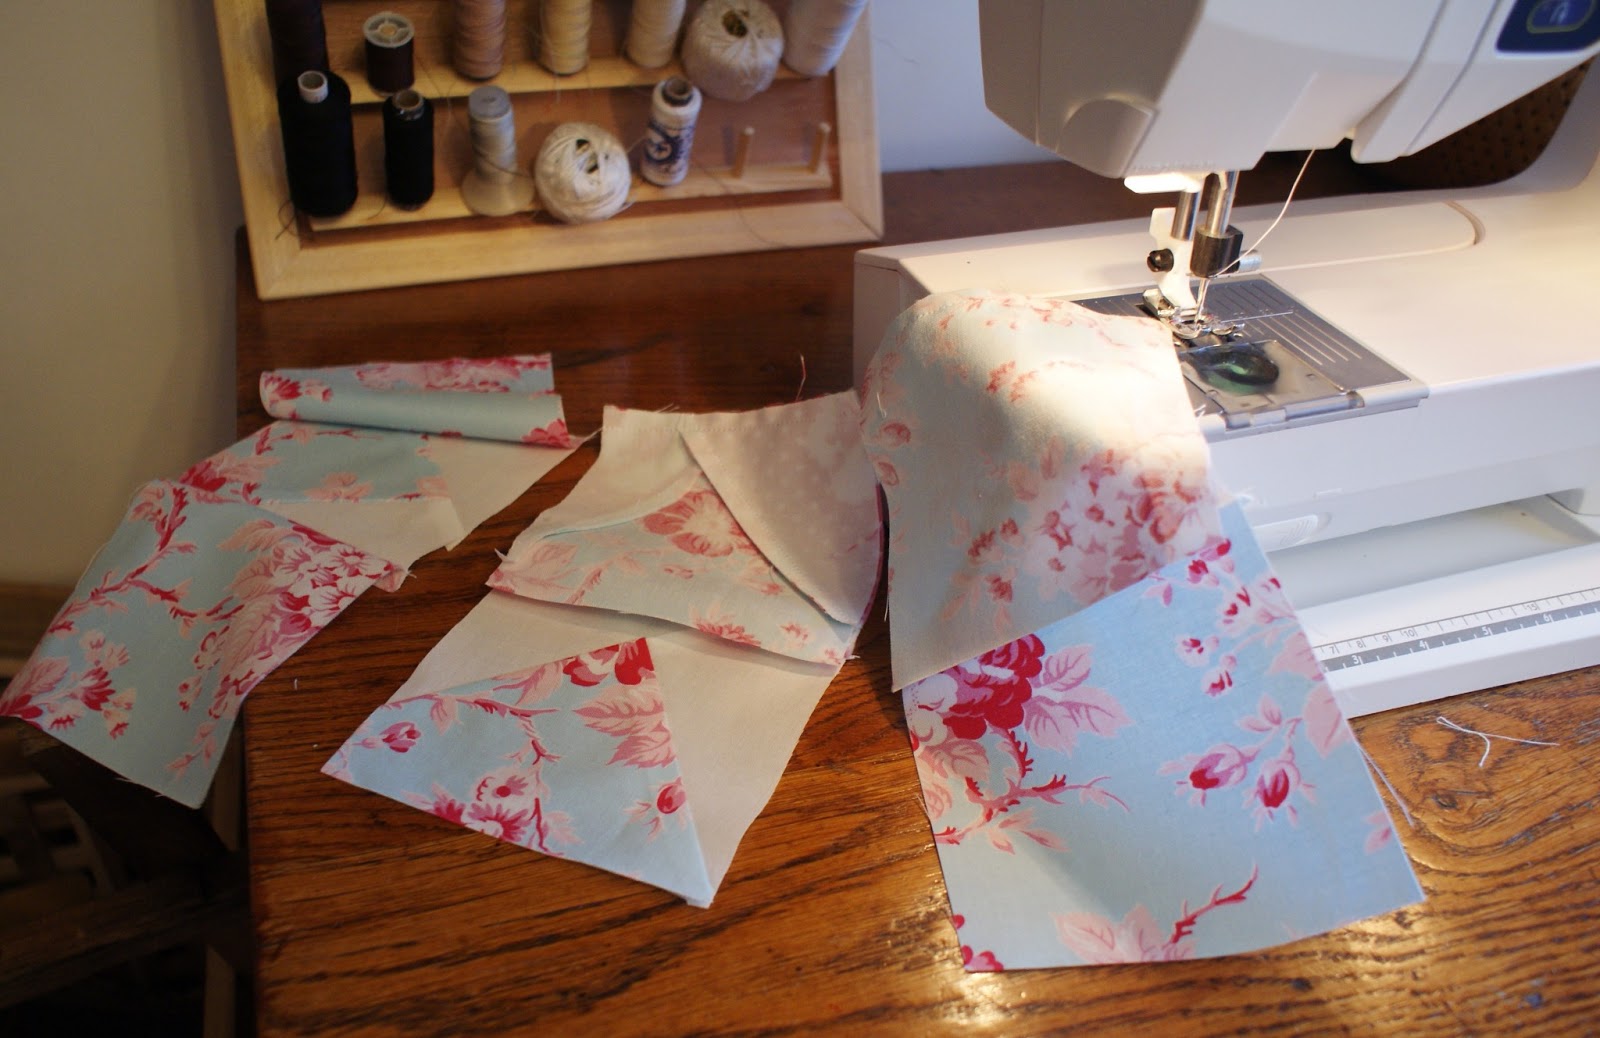
16. Lay out your squares, as you want them arranged.

 17. I sew the first 2 squares from each row together, so I can chain piece them. I then chop off the end piece from the chain, and sew on the last square in that row. (Here they are before the last square in each row is sewn on.)

18. And here they are with the last square in each row sewn on.

19. Iron the rows, with the seam allowances  to the dark sides. Here are the backs.

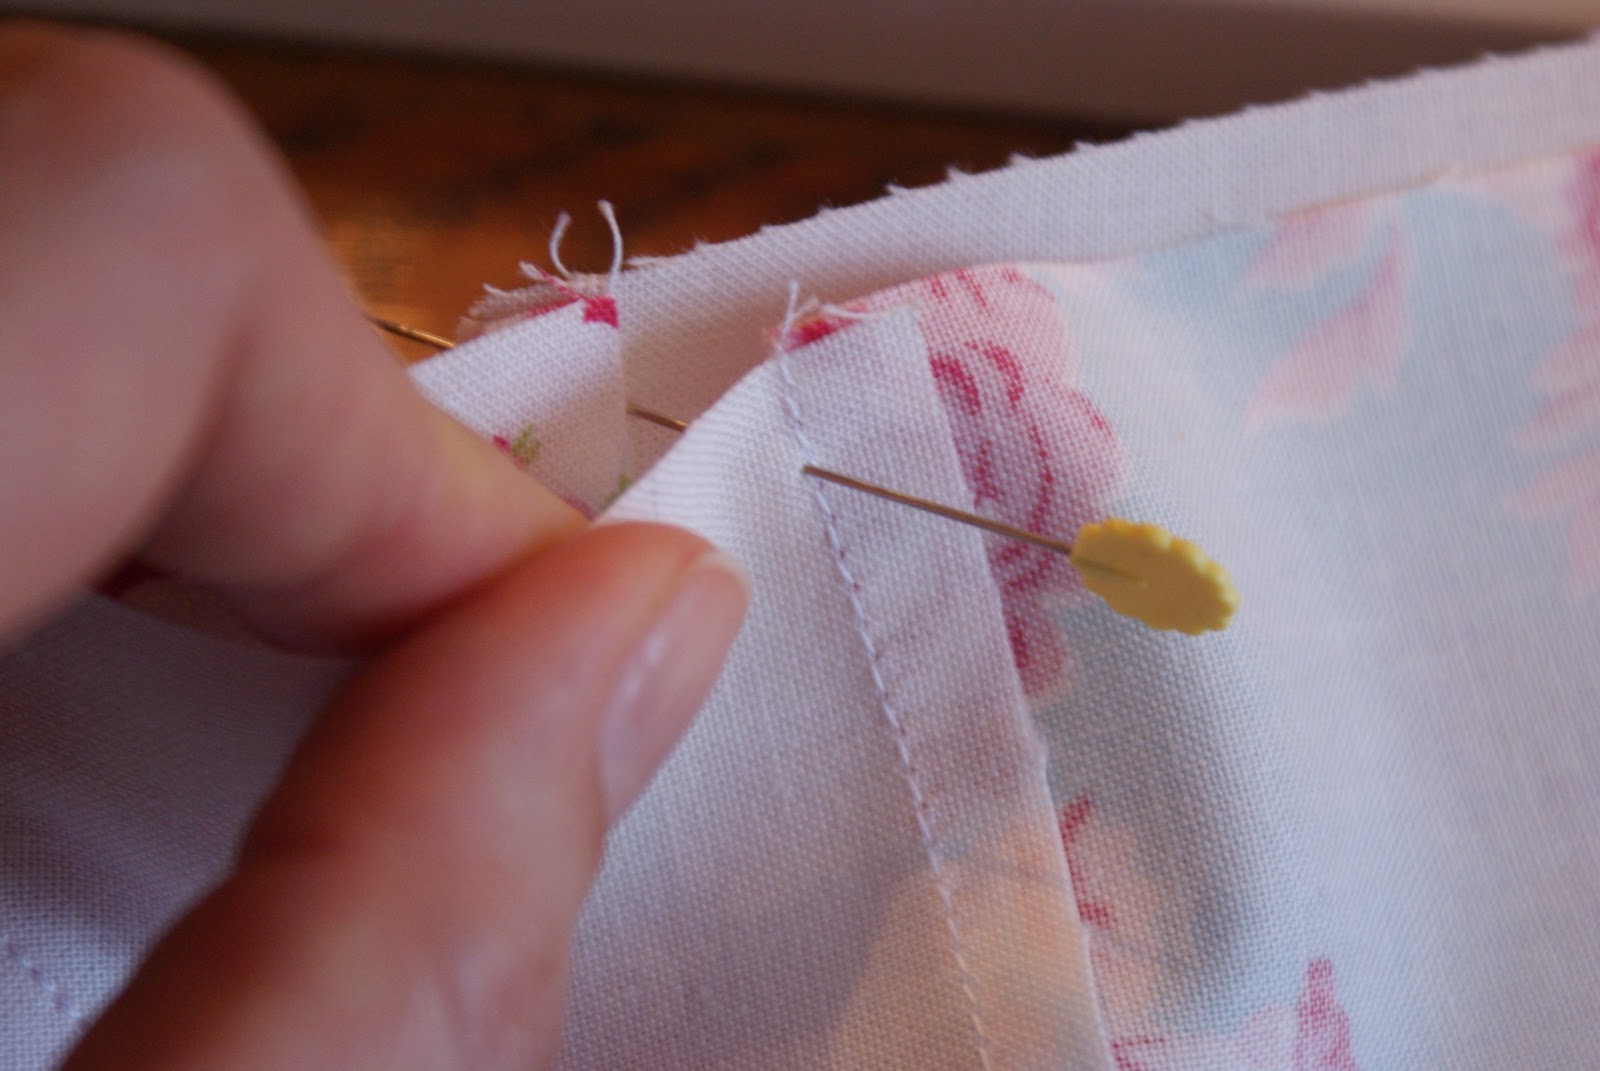
20. I'll just show you how I sew my rows together, so that the corners of the squares match up perfectly. I pin 2 rows together (right sides facing each other), by putting a pin in the seam 1/4'' down from the raw edge.

21. Continue by putting the pin through the underneath row, directly through the seam, again 1/4'' down from the raw edge.

22. Keeping this first pin sticking directly through both rows, pin either side of it, through both rows. You can then remove the sticking-out pin. This just keeps the 2 seams of the squares directly in line with other, with no movement when you sew the 2 rows together. It sounds a bit faffy, but it works beautifully every time.

23. The two seams of the two rows pinned together, ready for sewing. (I don't remove the pins till after I have finished sewing the whole length. Sew slowly over the pins, so you avoid breaking your sewing machine needle on them.)

 24. The three rows sewn together.
 See how the corners of the squares meet perfectly! Thanks to my quilting friend Liz, for showing me this!

25. Then just make a load more blocks!
 I'm going to sew quite wide, off-white sashing (the same fabric as the star points) in between and round the outside of my blocks, next...

Tuesday 1 January 2013

Copic Colour Chart

Happy New Year! Got back from London this morning - we watched that incredible firework display, from just across the Thames from the London Eye... totally crazy!!
One of my New Year Resolutions is to spend no money on any more craft stuff till my birthday (in May!) I had a mad splurge on Copics, so will take my time enjoying them!

I made this chart to help quickly pick out which Copic colours I want to use. There are a couple of other similar charts on the internet, which I found really useful in picking out which additional Copics to buy. Going by the colours on the online shops was not the best way of doing it and I made a few mistakes before doing more research. I hadn't realised that the first number of each pen represents a colour shade within a basic colour group (represented by the letters), and that the last number represents the depth of the colour. I hope this picture might be of some use for others starting out with Copic.

Good Bye Cards

Some friends of ours are emigrating to New Zealand in the next little while (Boo!!! Will miss them!!) 
Here are the cards I made for them from our family, and on behalf of some others from church.
This one has a Union Jack embossed panel behind, and the letters are Sizzix Stampin' Up 'Bigz Alphabet Typeset'.