I like taking part on challenge blogs, because they really are challenging! The challenge at Tuesday Throwdown is to do a Monochromatic card, and the challenge at Simon Stays Stamp is 'White on White', so I have combined the two. I'm not sure how much I like the result, but it's good to try new things!
Tuesday, 19 February 2013
Saturday, 16 February 2013
Sizzix Easter Card
It feels almost like spring today! I am celebrating, with my first Easter card this year...
I'm putting it on the Tuesday Throwdown challenge blog, who have an 'Anything Goes' theme this week.
I used Sizzix's 'Door, Opening & Wreath' die, Originals 'Eggs' die, and Movers and Shapers bird die.
I made my own little egg basket, and used Craft Concept's wood grain embossing folder on it. The turquoise paper and pom-pom trim are both Stampin' Up.
Friday, 15 February 2013
Sizzix Pop 'n Cuts Cupcake Birthday Card
There are lots of birthdays amongst my family and close friends in March, so I'm making a start on their birthday cards!
I used the following inspiration for this card... The Ribbon Reel Challenge, to use yellow, pink, ribbon, flowers, lace (my doily) or twine. Also, Cute Card Thursday's challenge is entitled 'An eye for detail' - I interpreted this as including lots of detail in the card!
I used Sizzix Pop 'n Cuts base die, with the label insert. I folded back the top half of the label, to make a flat surface, and draped a doily over it. I hand cut the cupcake (with a Stampin' Up scalloped edge punch for the top of the case), and attached the pearls onto it by threading them onto Baker's Twine first. I used Sizzix Bigz 3D Flowers die for the curly flowers with pearl centres, and the Sizzix originals Balloons die.
The' Happy Birthday' was cut using Cheery Lynn dies.
(A little later)
Yay! I made the Top 3, of the Ribbon Reel Challenge!
Wednesday, 13 February 2013
Music/Song inspired card
The challenge at Less is More is to have a Music themed card, with only one layer of card, plenty of white space, and minimal embellishments - really hard for me...this was difficult.
I combined this challenge with the one at CAS-ual Friday - to make a song inspired card, so I did Stevie Wonder's 'I just called to say I love you'
Monday, 11 February 2013
On the Sizzix Blog
I was really pleased yesterday... Karen Burniston who designs Sizzix's Pop 'n Cuts dies, had contacted me at the weekend about putting my Valentines card in her 'Pop[up] Spotted' post on the Sizzix Blog, so yesterday I was on it! (You can see the post here.)
Friday, 8 February 2013
Sizzix Rainbow Chevron Card (Tutorial) & some Interesting Cupcakes
I saw this chevron card by JJ Bolton a while ago on Pinterest, and thought that I'd like to have a go at making a rainbow chevron, using a similar technique. I don't have a large chevron die, but used the zig-zag border on my Sizzix 'Borders & Hydrangeas' die.
I started with a dark and a light shade of several colours of cardstock. (In retropect, my dark blue card was too dark, and stands out a bit too much on the finished pattern.)
I cut out a zig-zag strip in each colour, and separated the darks from lights, (sounds like doing the laundry, but is much more fun...) and put them in rainbow order.
I then used my Scotch Tape Glider (ATG) to stick the two separate rainbows down onto white cardstock.
I used a guillotine to then cut the rainbows into vertical strips, and rearranged them, alternating light and dark strips.
I then stuck these down into the finished pattern,
and cut around the outsides.
I just made the really simple card above, with the first one, adding a Melissa Frances rub-on.
I'll try and think of something a bit more creative with the second one!
Speaking of creative, I recently declared Wednesdays and Thursdays 'Screen Free' days in our house, so last night after school, the kids did some cup-cake decorating instead... 'creative' is one word to describe their efforts... ('Complete and utter devastation in the kitchen' are some other words which could also be used!)
Spot the burger cupcake, and the Salt & Vinegar crisp packet, among the designs!
Links to some of the products used:
Wednesday, 6 February 2013
Sizzix Pop 'n Cuts Valentines Card
I was glancing through the challenge blogs for some inspiration, and ended up making a card which used lots of them! Plus I set my own challenge... to make a Valentines card for my husband (never known him look at this blog, so I think I'm safe!) which wasn't too feminine - no bows, flowers, sparkly bits etc.
I used Basic Grey 'Curio' paper pad, for the Basic Grey Challenges blog,
the challenge at CAS-ual Fridays is 'Love Letters'. This is quite a clean and simple card for me, given that I'm not letting myself add any ribbons, stitching, bling or flowers!
At Crafty cardmakers, the challenge is 'Vintage Love' (I love the Basic Grey paper for its vintagey-wallpaper feel)
and DCM had what I thought was a very hard challenge of only using the colours Cranberry, Slate Grey, Pale Grey and White, but actually this really helped me stick to my not-too-feminine card, so thank you!
Papertake Weekly have an anything goes challenge this week,
I mentioned the Basic Grey Curio paper, plus I also used Karen Berniston's Sizzix Pop 'n Cuts with Circle label die, her 'Birds on a Wire' decorative strip die, and 'Buckle, Heart & Paperclip' Sizzlit. The leaves were a mixture of Sizzix Sizzlit 'Branch with Leaves' and a Martha Stewart punch. I also used a Stampin' Up scalloped border punch, and a metal frame from their Hodgepodge Hardware. I cut out the cardstock behind the frame, and stuck some acetate sheeting behind it, to attach the heart to. Sorry about the artifical lighting... Busy day tomorrow, so got it done tonight whilst in a card-y mood!
Monday, 4 February 2013
Sizzix Pop 'n Cuts Bird Cage Card & Dress Form Card
I had great fun making this card last night - using mainly Tim Holtz and Sizzix products. I went all out pink and girly! I wanted to hang the bunting from the bird cage, so it opens out when you open the card. It works really well!
The challenge at Simon Says Stamp is 'Anything Goes', and this is my entry.
Papers: Tim Holtz idea-ology Kraft Resist cardstock, and Prima Almanac 6x6 pad
Dies: Sizzix/Tim Holtz 'Caged Bird', 'Scrollwork' On the Edge die, 'Regal Crest' and Pop 'n Cuts with Circle label.
Stamps: Papertrey Ink 'Stitched Sentiments' (The curved sentiments fit really well into the banner from the 'Regal Crest' die)
I also used Copic pens to colour an adhesive pearl black, and to colour the ribbon to the right shade.
I saw this card on Pinterest, and though I don't have the new Stampin' Up dress dies, I thought I'd do a version with my old Sizzix 'Dress & Accessories' die. The chevron embossing folder is from Stampin' Up, and the paper from Papermania's 'Happy Days' 6x6 pad.
Saturday, 2 February 2013
Less is More Card & a Moustache Cake
The challenge at Less is More, is to use only kraft and cream on the card... no other colours!! Very hard indeed...
There's also been some other creating going on this afternoon, with my eldest making a moustache cake for her friend's birthday. This has got to be the easiest cake on the planet!! Cut from a single round Victoria Sponge cake, and smothered in chocolate butter icing. Don't you love the classy presentation?! We had nothing big enough, other than this tray :) It amused us enormously...
New Home Card
I used the sketch over at Mojo Monday to make a New Home card for some friends who recently moved, and are not having things go too smoothly for them.
I also liked the challenge at Cute Card Thursday, to fancy up one of the corners a bit...
I used a Stampin' Up house stamp from a roller wheeler for the image, coloured with Copics, and papers from Papertrey Ink. The washi tapes I had weren't really the right colour to match the rust coloured paper, so I coloured over the pink roses and red spotty tape with a rust brown Copic pen.
I also had a little crafting companion today... my youngest (still in his pyjamas...what else are Saturdays for?!) He got some pastels from my parents for Christmas, and has been really enjoying them.
I love this picture of him blending a sunset, over a meadow of daffodils (so he tells me).
He discovered that the images transfer once he closed his book, so took advantage of this to draw one flower on each side, then rub the pages together to double them!
And the same technique here.
I absolutely love it when my kids get satisfaction from crafting. So glad I haven't really put them off it (which they all claim!)
My Craft Space / Copic Colouring & Storage
I saw somewhere (probably on Pinterest) the technique of colouring in stamped images with Copic pens, where the image is stamped with pale ink, for a more natural look.
I thought I'd give it a go - here are a couple of the outcomes:
I used Memento Tuxedo Black ink (as most Copic stampers recommend) for the right-hand images, but didn't have Memento ink in a paler colour, so used VersaMagic Multi-surface Chalk Ink in Pixie Dust (pale pink) for the left-hand images. I let it dry for a while, and it worked fine.
I think the cupcake needed a bit more contrast to the edges of the different parts, but quite liked how the girl turned out. You can see a little of the light pink ink, but mainly it just fades away.
While I had all my Copics out, I thought I'd show you my unique Copic storage 'system'!! I bought my Copic pens not long before Christmas, but one of my new year resolutions is to spend no money (except on groceries) till May (my birthday). This meant I wouldn't be buying any nifty Copic storage though!
I like to have my pens arranged in the colour sets, so decided to temporarily store them flat in some chocolate boxes which were left over after Christmas. This actually works really well! It's easy to take them where ever I want to use them (in the living room for when I'm 'watching' a film for example), and the pens are instantly in the order I want them, plus because I have mainly Ciao pens, the numbers on the sides of the pen are easily seen. When I've finished, the boxes just stack neatly away. I like it this way so much, that I may not even buy any new storage units for them when I am free to spend again!
(I'm sure half the reason people buy Copics is just because they look so good...)
My two youngest boys each decorated one of the chocolate boxes, using Copics and washi tape, plus I keep a colour chart of the pens I have, on the other. I find the chart very handy for just glancing at to see what colour group I am after.
Here are the boxes packed away.
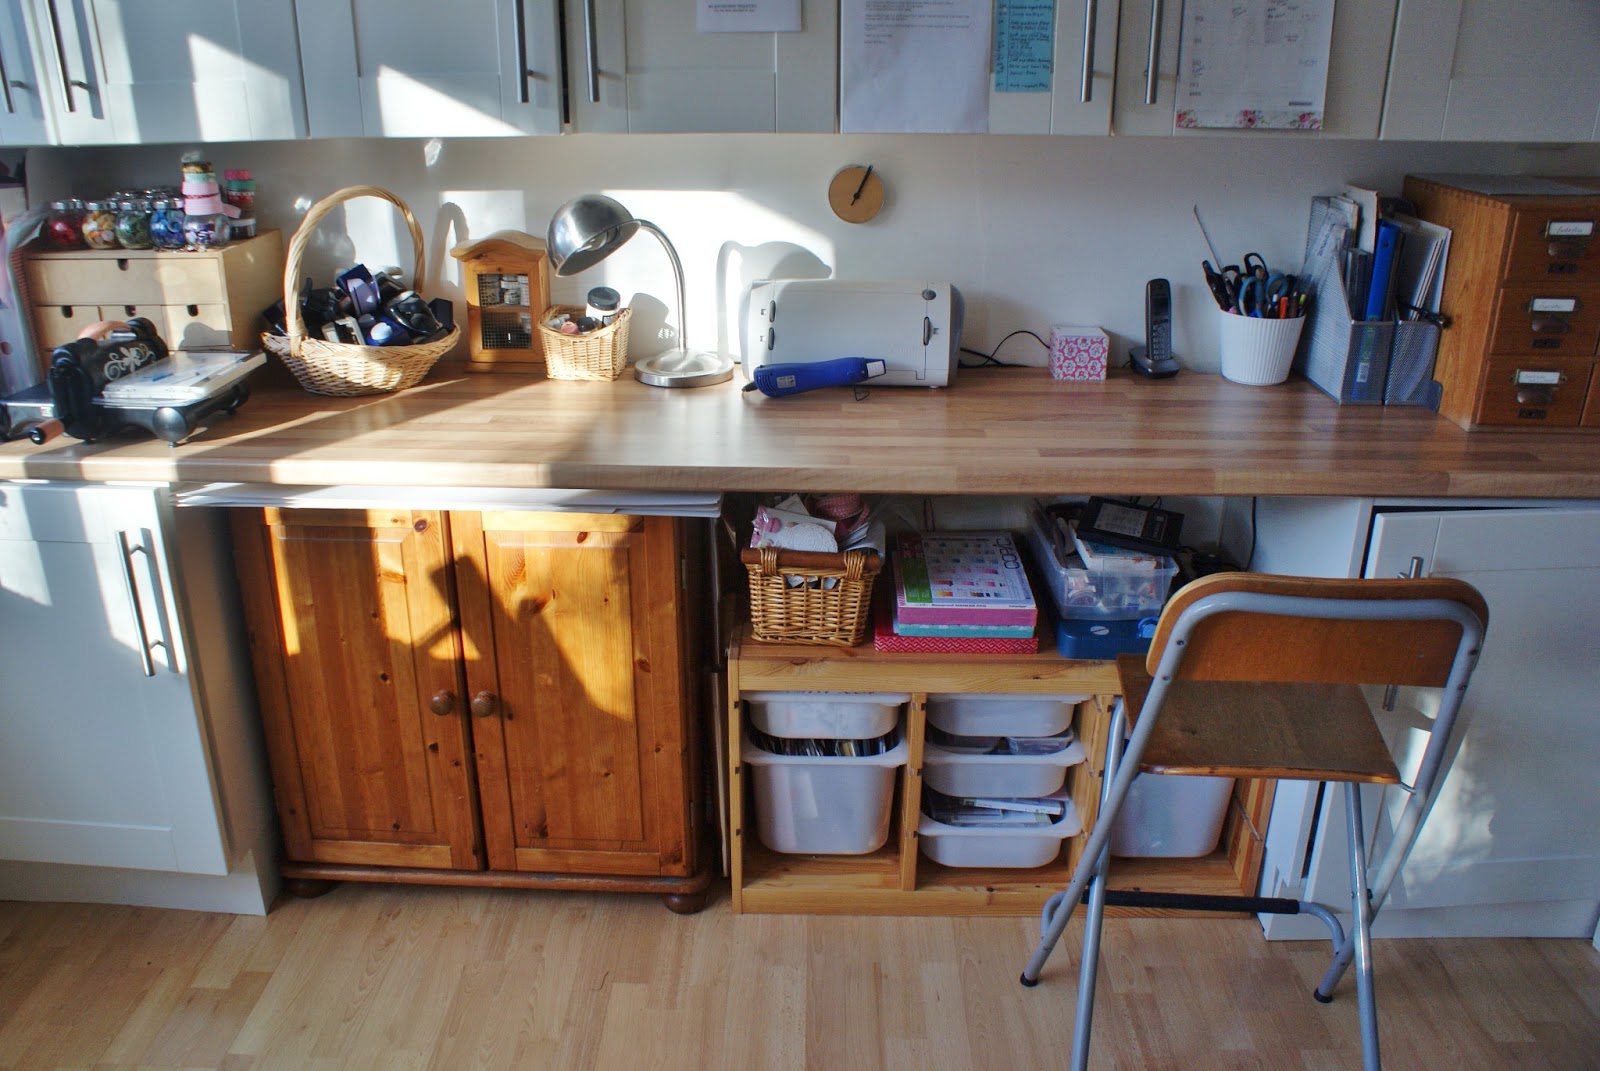
I thought while I was photographing some of my storage, I'd show you the rest too, especially as it's looking reasonably tidy for once.
This is at one end of our dining room (hence the name of the blog... it should really be called 'The Dining Room Cupboards', but it doesn't have quite the same ring, plus there are a few drawers involved!)
I keep meaning to make some curtains (maybe patchwork?!) to hide my messy storage underneath the work surface, but haven't got round to it yet.
One of the cupboards, which houses my large Sizzix dies, plus some other bits. I had a load of magnetic tape from years back, and this holds my wafer thin dies well.
Another cupboard, with some of my paper pads, plus card blanks, Cricut cartridges and embossing folders. (And rainbow organised buttons underneath!)
I don't have tonnes of Cricut stuff. It always seems too much hassle to get it underway - my first love is Sizzix, in particular the Original and BigZ dies - instant, and cut through anything.
And while I'm at it, this is the other end of the dining room - with lots of my craft books, sewing machine, and yes, dining room drawers, filled with fabric.
Subscribe to:
Posts (Atom)