Tuesday, 28 February 2012

Mojo Monday Birthday Card

A card based on the square layout over at Mojo Monday.
I love the matching stamp set for the Decorative Label punch from Stampin' Up.

Monday, 27 February 2012

Card Patterns Birthday Card

A couple of cards made using the Card Patterns design below, flipped upside-down.
I used Stampin' Up 'Heart to Heart' and 'Decorative Label' punches, and their 'Perfectly Penned' stamp.


Friday, 17 February 2012

Vanilla and Chocolate Cupcakes

My parents came on Valentines day, and the kids were on holiday from school. We had some cupcakes at lunch...
 Last night I went to a training evening, and made some cupcakes for the refreshments. I find it very relaxing decorating them, though less so clearing up the monumental amount of mess I have created afterwards...
I used vanilla butter icing, and a chocolate cream cheese icing, plus some rolled fondant.
 Here they are all tucked up in my new Cupcake Courier. The only thing I think lacking with the design of the carrier, is a couple of lowered points each side of the cupcake holes, for you to get your fingers in and lift out the cupcakes. Still really happy with it though.
 Another few cupackes I made, using a Cuttlebug embossing folder. I've also been trying to improve on my fondant rose making. I now cut out 6 or 7 circles, flatten them some more, and stick them together with water. The first petals I add curling inwards, and the last few curling outwards.

Saturday, 11 February 2012

Cupcakes and The Cupcake Courier

I had a fun (and very messy) day yesterday making cupcakes, for refreshments for my book club meeting last night.
Here are a few that were left over this morning!
I should also mention that I got the polka dot and stitched textures on my cupcake tops by rolling icing onto embossing folders (- designed for using with cardboard in die cutting machines, for card making). These only cost about £3.50 each, rather than buying expensive textured rolling pins. I buy embossing folders from here.
Also in the post today I took delivery of a 'Cupcake Courier'. It's fantastic!! A great alternative to carrying loads of old 'Celebrations' tubs with only a few cupcakes in each. This holds 36, and my younger boys and I had a good time swinging the case around to test how much of a bashing the cupcakes can take without being damaged. (The answer is quite a lot... you have to virtually turn the whole thing upside down to do any damage.) I got it from here.
 I was also pleased with the depth between each layer - you can have the icing quite tall and it will still fit in. (Approx. 6cm in total from the bottom of the cupcake.)
 And a nice big chunky, airtight lid.

Cards

I needed to make a lot of cards this week - to send to the girls in the Youth programme which I help run. Here are a few I made, based on a design I saw on Pinterest, by Joy Taylor.

Saturday, 4 February 2012

String Quilt Cushion Cover (Tutorial)

I haven't been well this week, and have spent far too long looking at lovely stuff on Pinterest, but today I was itching to make something.
I had seen a tutorial for making string quilt blocks which used paper piecing, but I wanted to have a go with a fabric base in order to make four blocks for a cushion. Here's what I did:

I want my final blocks to measure 8'' when made up, so cut 4 squares of plain white fabric, to 9'' (in theory I only need 8.5'', but I want to allow for a bit of extra trimming space.)
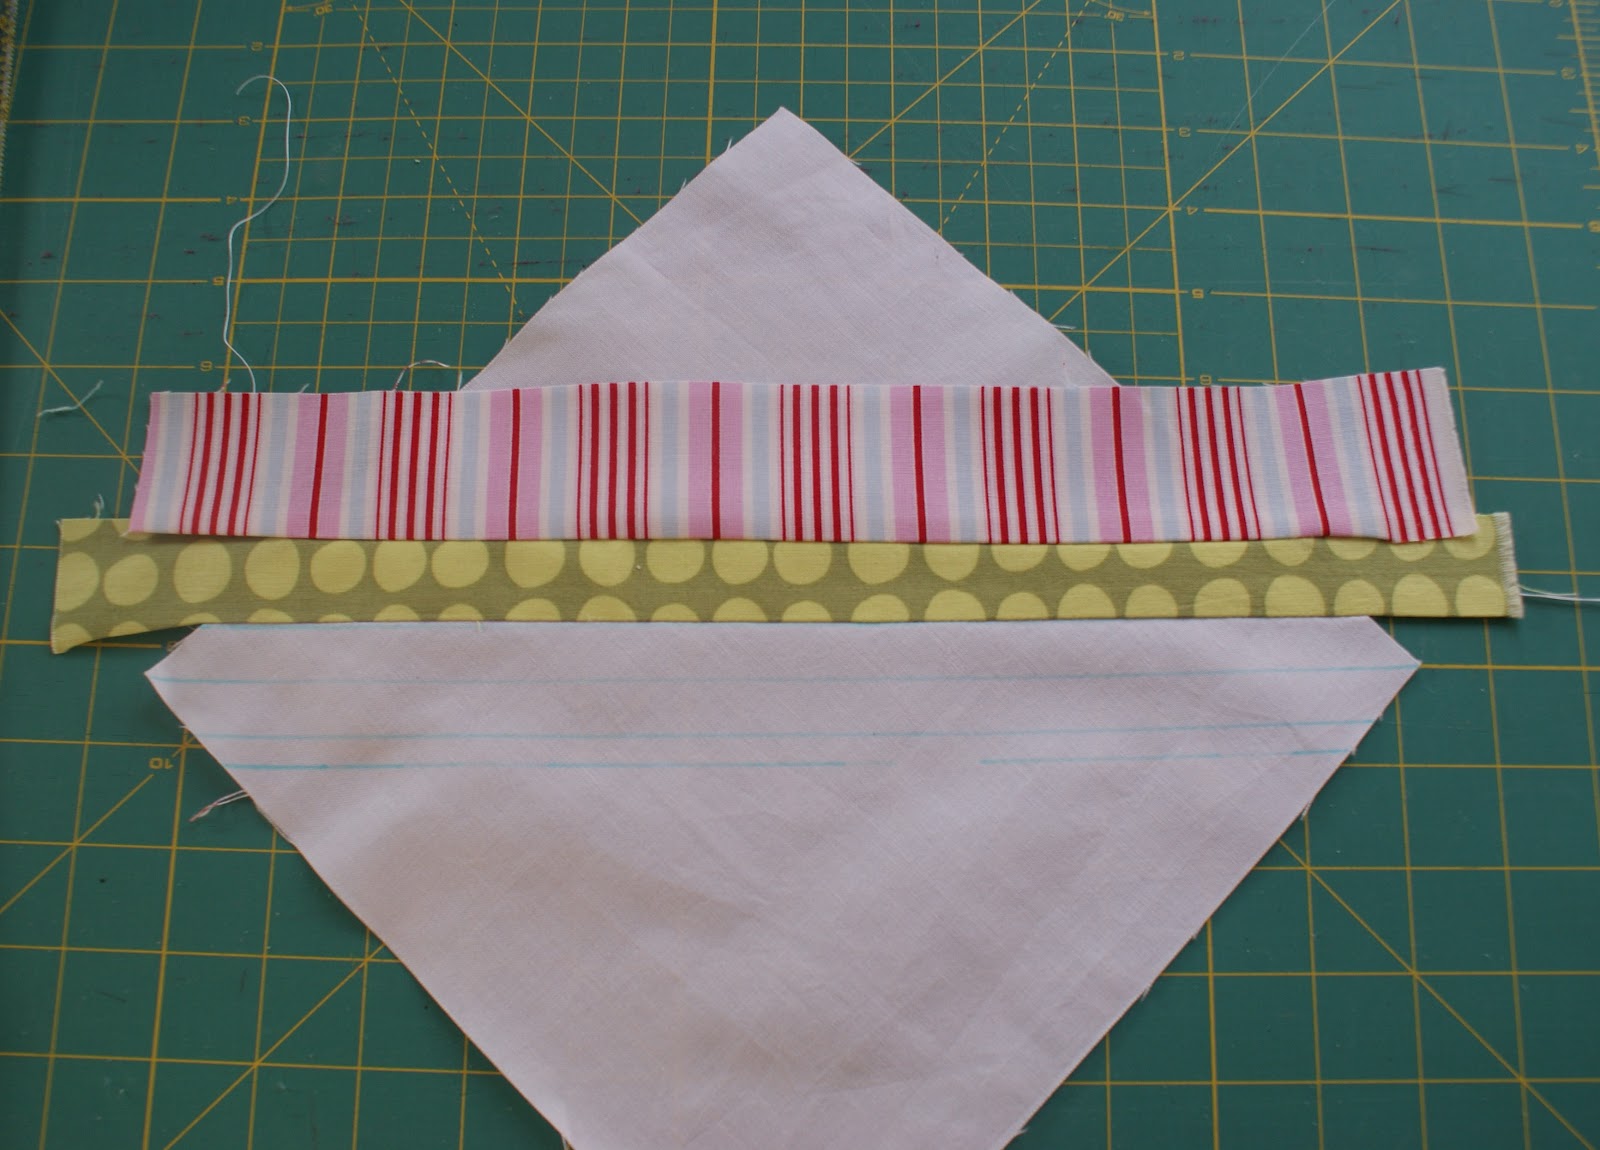
In water soluble pen I drew across the diagonal, then drew 2 lines 1/2'' either side, then 2 more lines 1/4'' out from those.
I want to end up with a 1'' white stripe down the centre of each block.

I cut my first fabric strip for attaching. I want my stripes to remain parallel to the central stripe, so am cutting each one with parallel edges.
I lined up my first strip, face down, neatly to the very top blue line I drew. This is pinned in place, then sewn with a 1/4'' allowance (which means my first strip is now attached along the blue line that was 1/2'' from the centre line.)

 Lift up the attached fabric and iron.

Lay your next strip, face down, matching one edge to the top of the previous strip.

This is again sewn, and ironed upwards.

Carry on in the same way, till that half of the block is completely covered with strips of fabric, then start on the other half in the same way.

The first strip on the next half is again aligned with the top blue line that was drawn on. In this way I created the 1'' white centre stripe that I wanted.

Keep going, lining up edges, pinning and sewing!

When the block is covered, flip it over and trim it. I measured up the diagonal line on my ruler with the centre of my white stripe, then trimmed the whole thing to 8.5''

I love how the back of it is so neat! So unlike my normal quilt top backs!

Four blocks later...

I sewed them together with 1/4'' seam allowances, and considered using it just like this for the cushion top, but decided to quilt it, with thin wadding and muslin on the back.

I love it when it goes all bumpy!

I then trimmed the edges again.

For the cushion back, I overlapped two pieces of heavier fabric (with raw edges turned over a couple of times, ironed then sewn) right side up, to make an envelope opening.

This was all pinned in place, then I sewed 1/4'' in from the edges all the way around.

My final job is to add binding, in the same way as I would to a quilt.
(I did actually sew on some bright red binding, but it made it look like a Christmas cushion, so I cut it all off again!
I'll be binding it in white I think, shortly...)
The final cushion is here.

Thursday, 2 February 2012

Re-organisation

We have been having a bit of a change around in our house recently, and I now have a dedicated sewing space! When I started quilting, I worked at a plastic fold-out table, which I handed over to my husband last year when he started teaching an early morning Skype class for teenagers from church.
We got rid of our old computer at the weekend (Laptops only now!), so Scott can now have that space for preparing his lessons, and I have pinched my oldest son's desk!
It's been nice getting a bit more sorted out. 
My cottons before...
 ...and after! 
I bought this thread storage rack on ebay yesterday, and it arrived today...
Cannot resist rainbow organisation.
This used to be my desk when I was a teenager - it's an old teachers' desk, complete with little sliding door for an inkwell (ideal for the wire for the treddle!) It brings back memories to be using it myself again!
 My favourite books are now in reach.
 And I truly am working out of my dining room drawers!

Wednesday, 1 February 2012

Purple Cupcakes

Tried out the new Hydrangea cutter and silicone mould which I got for Christmas, for the first time...

Monday, 23 January 2012

Up-cycled Skirt

I wanted a new casual winter skirt, without spending much money though, so I bought a long flarey cord skirt from the local charity shop (it worked out at less than £1), and chopped the bottom off. (I measured to the same length at several point around the skirt, marked it with pins, and cut round by eye, joining up the pins, then hemmed it.)
With the spare fabric, I made some roses. (Cut long strips, folded them in half, sewed along the bottom in my largest stitch width, then gathered them up, and stitched them into place.)
 My new skirt.

Cake!

Some ring cakes I made for a New Year's Eve party (Not very classy presentation - the lids of Celebrations chocolate boxes... very handy for transportation!)
I didn't know how to make toffee icing, so I made up some plain icing with icing sugar and water, then mixed in some Condensed milk toffee sauce. Not bad.

Monday, 2 January 2012

Crafts in the Christmas Holidays

We've had a nice, pretty relaxed Christmas time, and once the kids broke up from school, we spent quite a bit of time just making and drawing etc.
A felt thing I sewed for an old school friend. 
I adapted the design from this book by Clare Kingslake.
Very simple Christmas card design, using wooden Christmas tree ornaments, which I bought when they were on sale after last Christmas. I like the new reindeer embossing folder I bought from Cutting edge crafts (Link to right hand side.)
A Christmas card for a quilting friend! (The layered cardboard pieces were from Cricut's Country Life cartridge.)
Jack, our 2nd eldest, started making this creature ages and ages ago, and Lucy decided to finally finish it off for him. I like that it has glow-in-the-dark Hama beads for its mouth!
An applique picture for another friend, similar to one I've done before.
 I was itching to do a bit of quilting, so made this Christmas cushion one evening.
 I sewing machined a snowflake pattern along the back, and hand-sewed on beads.
And last but not least, the first baking I have ever seen my husband do! He took part in a pay-it-forward handmade gift thing on Facebook, and decided to make gingerbread London Temples for two of our friends... Can't say they're not creative!!
(Incidentally, for anyone not familiar with the London Temple, of the Church of Jesus Christ of Latter-Day Saints, here's a pic I took recently. See! Almost identical! - down to the green copper spire, golden angel on top, and pond to the side...)