I was recently asked to try out and review a new product called ThermoMorph.
It arrived really promptly in the post, and I have spent this afternoon playing with it.
I made the butterfly and rose on this card with it... read on to see what I think of ThermoMorph, and some of its possible applications in crafting.


ThermoMorph's polymorph granules comes in a 500g tub, which you put into boiling water. The instructions call for you to let the water cool to 60 degrees, to avoid scalding. (After a few uses, I felt happy to put the pellets into freshly boiled water though - no need for the thermometer.)

After a minute or two, the pellets turn clear, and stick together, at which point I fished them easily out the bowl with a spoon. I didn't find that the Thermomorph stuck to anything else - I could pick it up easily, and begin kneading it into a smooth modelling material.

I'd compare the consistency of it to soft, smooth bubble gum!
I read in one of the Amazon reviews that Thermomorph can be coloured with food colouring. I had a go with using a food colouring paste (against my better judgement - it is plastic after all!) and the colour didn't take at all, I just made a huge mess of my hands. I then had the idea to try using the colour powders that are used for colouring fondant icing. (Mine are called 'Edible Tints' and 'Edible Lustre'.) I tried using a shimmery white glittery lustre first, which had this subtle result:
I read in one of the Amazon reviews that Thermomorph can be coloured with food colouring. I had a go with using a food colouring paste (against my better judgement - it is plastic after all!) and the colour didn't take at all, I just made a huge mess of my hands. I then had the idea to try using the colour powders that are used for colouring fondant icing. (Mine are called 'Edible Tints' and 'Edible Lustre'.) I tried using a shimmery white glittery lustre first, which had this subtle result:

After kneading the lustre in, a minute or two later the Thermomorph started to get more solid as it cooled, so I put it back in some boiled water. None of the lustre powder transferred into the water at all, and after another moment or two, it was soft enough to work with again.

I pulled a smaller piece off (you can see the quite clean way it pulls off in the photo below), and pushed it into a silicone flower mould. After only a minute or two, the flower could be pulled out, and I was really pleased with the results - virtually no air bubbles, and a good clear impression of all the details in the mould - plus it set extremely hard really quickly, and the flower would be ready to use straight away.

I then coloured some more ThermoMorph with a shimmery pink, and matt blue. I really like how the blue turned out. The flower looks like one of the expensive resin flowers you can buy for card making and scrapbooking etc. From a tub this size you could make hundreds of flowers.

Some of the shimmery pink, in a different mould.

I then had a go with some more Thermomorph, and this time rolled it out. It didn't stick to my work surface, or the small acrylic rolling pin I used.

You can get it really thin.

I then had a go at rolling some out on an embossing folder surface. It took on the embossed pattern very easily, and then set hard.

I tried cutting the rolled out, set ThermoMorph in my die cutter. It was slightly too tough to be cut with wafer thin metal dies, but worked fine with the Sizzix Bigz dies. Even with the pressure of the rollers in the die machine, the embossed shape did not flatten out - it really does turn into properly sturdy (slightly bendy when thin) plastic.

The waste ThermoMorph can then be just thrown back into some boiled water, and re-shaped. I just threw this cooled blue blob back into the tub, ready for when I next want to use it.

I also had a go at painting the hardened ThermoMorph. You can see from the flowers at the bottom of the photo below that the paint (I used Tim Holtz Distress Paint) doesn't stick evenly, but pools a little in the cracks. The cream and black plaques had two coats of paint. I didn't especially like this look, and the paint took ages to dry, as it was on a non-porous surface. To colour ThermoMorph, I would definitely recommend using powder colour. You only need to use a little bit of powder. You might have better luck using a spray paint designed for plastic though.

Below: Black plaque was painted with 2 coats of Distress Paint. White plaque and top row of flowers are plain ThermoMorph with nothing added, the two rows of pink flowers have varying amounts of 'Edible Lustre' powder in them. I'm sure there are other powder colour products on the market - I was just using what I had on hand from my cake decorating stash!

My verdict:
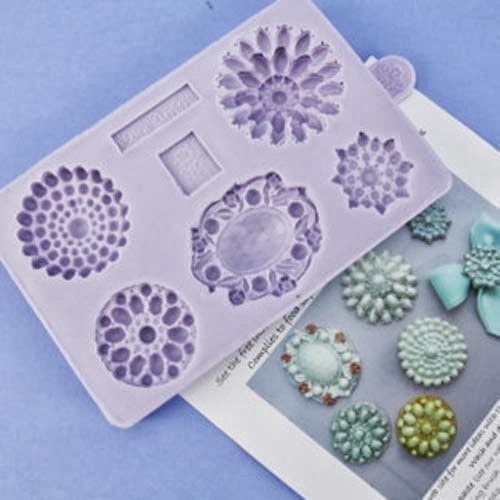
I'm really excited to use ThermoMorph in more moulds, to make 'resin' looking embellishments for my cards. There are tonnes of great, relatively inexpensive silicone moulds on ebay. I would suggest only using ones where the shape is mainly in one mass (such as these below - pictures taken from eBay.co.uk) - no thin or fidly bits, remember - think 'bubblegum' consistency.


I will also be very likely to get some more powder colours. I'll stick with edible ones, so they can double-up for when I am working with icing.
I think I might well roll, emboss and die cut more shapes too, for some added dimension and texture to my cards.
I know I haven't explored lots of the other possibilities of ThermoMorph - the other Amazon reviews talk about using it to fix items, mould objects from scratch etc, but none spring to mind at present for me.
I let my kids play with some after school, but by the time it was cool enough for them to handle, it was becoming less pliable, and they didn't manage to make anything worthwhile. I think this is the one drawback of ThermoMorph - that you only have quite a limited time available to work with it. Yes you can throw it back in hot water to make it pliable again, but then you pretty much need to start again.
All in all, I like it - I can easily see myself using it to make shapes for cards and 3D projects. It melts and sets quickly enough for this to not be very time consuming or off-putting, and it's clean and fun to work with.
The flowers & butterflies came out pretty. I've never heard of THermomorph, but it looks fun.
ReplyDeleteGreat review. Just wondering if you have every played with paperclay or polymer clay. If you have, would you find yourself choosing over the others. Cool molds too! thanks as always for sharing.
ReplyDeletePaper clay made from paper pulp and your local clay slip store is the name of the game in my book. If you have a kiln all the better. But air drying it works too as long as you keep pieces in indoors. Some major Artists are not firing but just allowing it to air dry. Not to be confused with the paper clay sold in craft stores.
DeleteWow, the results from the moulds and embossing are really fab - and with the amount of colours out there in baking colourings you could get some great shades. Great review. :)
ReplyDeleteLike the look of this but don't know where to buy it?
ReplyDeleteI know Amazon sells it, but not sure where else.
Delete