The day before yesterday, I was working my way through a big long list of Things To Do, when by mid-afternoon I ground to a halt, and had the mad urge to make my first zippered pencil case.
Here's what I did: (I follow pictures better than words, so this is my reminder.)
1. Cut out 2 outer fabrics and 2 lining fabrics all the same size. The zip can be longer than needed.
2. One lining fabric (spotty one) face up, zip laid along top edge, face up, then lay an outside fabric face down. All three top edges are in line with each other. I pinned mine.
3. Use a zipper foot on sewing machine, and sew along top edge of zip, through all three layers.
(You don't really want to sew past the zip pull part - it's too chunky, so after sewing part the way across, open the zip, so the zip pull is behind your sewing machine needle.)
4. Here it is now with one lining and one outer fabric sewn onto one side of the zip.
Fold both pieces of fabric down away from the zip. (Only the outer fabric has been folded away, so far, in the picture below.)
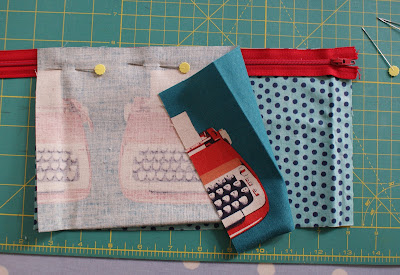
5. Lay 2nd lining fabric face up. Place the zip (zip teeth face up) along the top edge.
6. Place the 2nd outer fabric, right side down, on top of the zip. I then pinned mine, and sewed along the top edge of the zip again.
7. The 2 linings, and 2 outer fabrics are now attached to the zip. Iron them neatly away from the zip.
8. I then sewed along either side of the zip. (I actually sewed along each side twice in this picture - but only because I made such a mess of the first line, and somehow I imagined a second line would make it look neater... nope - just 2 messy lines either side of the zip now.)
9. Then make sure the zip is open half way (important for when you want to turn the pencil case right-side out later on), and open out the whole thing with the 2 lining fabrics facing each other, and the 2 outer fabrics facing each other.
Make sure the zip teeth are pointing down into the lining side - this makes the finish neater.
Try and get the 2 sides of the zip lined up really well with each other. Mine went a bit skew-wiff, and next time I make one, I will definitely pay more attention to this.
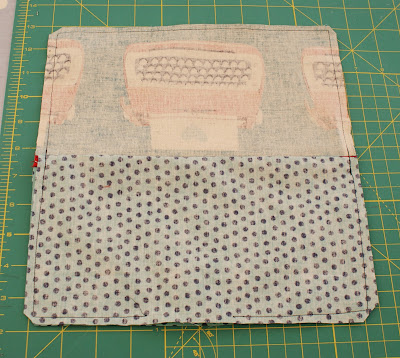
10. Start sewing all the way round, starting at the bottom of the lining side. Leave a couple of inches gap at the bottom of the lining, for turning the whole thing right-side out. I sewed a couple of times forwards and backwards over the 2 ends of the zip, for extra strength.
I trimmed round the edges afterwards, to neaten them up, and also snipped off some fabric in each corner.
11. Turn everything inside out, then pull the lining out of the pencil case. I folded in the raw edges where I had left the gap in the lining, and sewed a little line along the bottom.
Iron the pencil case while the lining is sticking out, so that you don't iron creases into it.
Use something pointy, but bluntish, to poke into all the corners to get them neat.
Use something pointy, but bluntish, to poke into all the corners to get them neat.
12. Ta da!! Definitely not perfect (wonky stitching along zip, and zip ends not lined up perfectly), but still very pleased with my first effort!


I love your tutorial, I am going to make some right away, thank for the tutorial.
ReplyDeleteFantastically easy tutorial - thanks for this!!
ReplyDeleteDefinitely one of the best pencil case tutorials I've ever seen, and I've seen a slew of them. Thanks!
ReplyDeleteGreat tutorial - what size did you cut the fabric?
ReplyDeleteHi Becky, I cut each rectangle to about 11 inches x 6 inches.
DeleteThanks Helen, I am going to give this a go for my little girl :)
DeleteThanks so much. This is the first time I've made something by myself without swearing at the sewing machine!
DeleteThank you for this brilliant tutorial - my first time making a zipped pencil case and I am very very happy with the result!
ReplyDeleteWhere did you find that typewriter fabric??
ReplyDeleteHi,
DeleteIt's by Melody Miller, and I found it on Etsy.com
That is the most spectacular fabric I have ever seen. Take my money. I'm actually at my machine right now and ready to make it with some newspaper fabric!
ReplyDeleteLOVE IT going to make one right away
ReplyDeleteI love that fabric! And this project is so perfect. I shared it on my blog today: http://www.vixenmade.com/2013/08/diy-school-supplies.html
ReplyDeleteThis is potentially the cutest thing I hav
ReplyDeleteMrs. Brooklyn Limestone shared this tutorial and I am so glad she did! You make this look so easy! Thank you!
ReplyDeleteJust made one for my son's secret santa at school! thanks for the clear tutorial!
ReplyDeleteHi! I just love this tutorial. Who is the turquoise with navy dots fabric by? I really want to try and find it.
ReplyDeleteThanks!
Hi Celina - thank you. I'm really sorry, I can't remember who the fabric was by - it's a few years old. I just checked the selvedge to see, but it's not on the bit that's left. I bought it from http://www.etsy.com/shop/sewdeerlyloved
DeleteHelen
Hi Helen
ReplyDeleteThank you for the instructions, I have just made a pencil case for my step daughter Nicole. I added a layer of wadding, an extra row of decorative stitching next to the zipper to hold the fabrics together and made a zipper pull out of the inner fabric to match. I posted it to Pinterest and added your blog details ;)
Many thanks
Helen Wincote
Ps this is the first time I've ever commented on a blog, getting addicted to reading bogs, already addicted to Pinterest
Hi Helen! Your pencil case sounds great! I know what you mean about Pinterest and blogging - very addictive, but so much fantastic inspiration!
Deletehaha, hi Helen! I was just searching for a pencil case tutorial and found one on your blog! I love that fabric you found. :-) So cute! I hopd you are having a good week and not getting to wet with all of your storms. TTYL, Jeanette
ReplyDeleteHiya Jeanette!! It's finally sunny, thank goodness... plenty of flooding around though, and our trampoline stuck up next door's tree! Hope preparations are continuing well xx
DeleteThis is my first zipper project and I was on another site following their tutorial, but it didn't make sense. I found yours and I got it done perfectly. I'm so excited! Thank you very much :)
ReplyDeleteThank you so much for the clear pictures and directions!
ReplyDeleteThanks for a wonderfully easy and clear tutorial, I wanted a very simple pencil case for my 10yr olds first sewing project, this was just perfect! I looked at heaps and this was by far the BEST I could find. Thanks so much!
ReplyDeleteWhat is the finished size of the pencil pouch?
ReplyDeleteThanks for your answer.
Hi, this one is approx 9.5'' x 5.5''
DeleteThank you for this! I appreciate your expertise and honesty : )
ReplyDeleteI started a one of these looking at a different blog and got very frustrated as there seemed to be missing information and limited photos. Which made a mediocre sewer like me want to throw in the towel. But I found this and am very thankful!
Qué buenas fotos, muy buena explicación...¿me resultará?
ReplyDeleteGracias por compartirlo.
Wonderful tutorial! Thank you! I added interfacing to mine for structure but otherwise your instructions worked perfectly. My creation: http://imgur.com/WkbpQgk
ReplyDeleteThis is the clearest tutorial I've read. I can hardly wait to make one. Thanks!
ReplyDeletethe tutorial is answering my problem a lot. thank you
ReplyDeleteBeen searching for a basic but beautiful pencil case to make for Operation Christmas Child boxes and I finally found one!!! Thank you!!!
ReplyDeleteHello, Where do you get the mat from that your using to help messuare the size? I'm new to all this so still learning to get the hang of using my sewing machine. i've got loads of ideas to what i want to do but i've not got a clue where to start.
ReplyDeleteHi, I bought mine from Cottonpatch.co.uk, but depending where live, I'd just google 'quilt cutting mat'. I'd just keep looking at online tutorials and on YouTube to learn the basics! xx
DeleteThis is brilliant so quick and easy, thanks x
ReplyDeleteHola! I've been following your site for some time now and finally got the courage to go ahead and
ReplyDeletegive you a shout out from Atascocita Tx! Just
wanted to mention keep up the fantastic work!
Hello from the UK!! Thank you!
DeleteLove it! Going to make one right now!
ReplyDeleteHI there, I love your tutorial. Thank you for sharing
ReplyDeletein our school days we dont have any epic ides like now a days we have more colorful
ReplyDeletemore designs and more interesting Pencil Box we have