The day before yesterday, I was working my way through a big long list of Things To Do, when by mid-afternoon I ground to a halt, and had the mad urge to make my first zippered pencil case.
Here's what I did: (I follow pictures better than words, so this is my reminder.)
1. Cut out 2 outer fabrics and 2 lining fabrics all the same size. The zip can be longer than needed.
2. One lining fabric (spotty one) face up, zip laid along top edge, face up, then lay an outside fabric face down. All three top edges are in line with each other. I pinned mine.
3. Use a zipper foot on sewing machine, and sew along top edge of zip, through all three layers.
(You don't really want to sew past the zip pull part - it's too chunky, so after sewing part the way across, open the zip, so the zip pull is behind your sewing machine needle.)
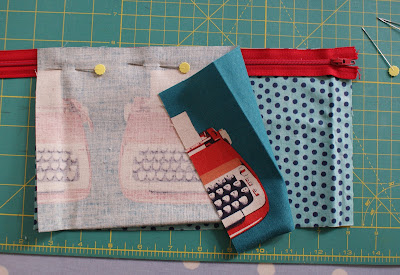
4. Here it is now with one lining and one outer fabric sewn onto one side of the zip.
Fold both pieces of fabric down away from the zip. (Only the outer fabric has been folded away, so far, in the picture below.)
5. Lay 2nd lining fabric face up. Place the zip (zip teeth face up) along the top edge.
6. Place the 2nd outer fabric, right side down, on top of the zip. I then pinned mine, and sewed along the top edge of the zip again.
7. The 2 linings, and 2 outer fabrics are now attached to the zip. Iron them neatly away from the zip.
8. I then sewed along either side of the zip. (I actually sewed along each side twice in this picture - but only because I made such a mess of the first line, and somehow I imagined a second line would make it look neater... nope - just 2 messy lines either side of the zip now.)
9. Then make sure the zip is open half way (important for when you want to turn the pencil case right-side out later on), and open out the whole thing with the 2 lining fabrics facing each other, and the 2 outer fabrics facing each other.
Make sure the zip teeth are pointing down into the lining side - this makes the finish neater.
Try and get the 2 sides of the zip lined up really well with each other. Mine went a bit skew-wiff, and next time I make one, I will definitely pay more attention to this.
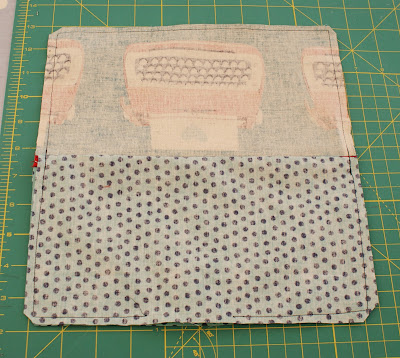
10. Start sewing all the way round, starting at the bottom of the lining side. Leave a couple of inches gap at the bottom of the lining, for turning the whole thing right-side out. I sewed a couple of times forwards and backwards over the 2 ends of the zip, for extra strength.
I trimmed round the edges afterwards, to neaten them up, and also snipped off some fabric in each corner.
11. Turn everything inside out, then pull the lining out of the pencil case. I folded in the raw edges where I had left the gap in the lining, and sewed a little line along the bottom.
Iron the pencil case while the lining is sticking out, so that you don't iron creases into it.
Use something pointy, but bluntish, to poke into all the corners to get them neat.
12. Ta da!! Definitely not perfect (wonky stitching along zip, and zip ends not lined up perfectly), but still very pleased with my first effort!
(Update: My pencil case now has a twin!!)


