Pages
▼
Wednesday, 29 September 2010
Charity Quilt Tops
Well we had our charity quilt day at church yesterday. There were some wonderful ones made, and the two I was responsible for turned out better than I was fearing. For total scraps, not too bad!
Thursday, 23 September 2010
Happy Houses
I've been asked to do a stall at a Christmas fayre - I have a vague vision of some handmade cards, and sewn things, and the other day I actually made a start... one padded heart. Hopefully I will get round to making some more things soon.
Two nights ago though, I started a new quilt. I had designed a house square for the first quilt I made, and I think it was my favourite square, so I decided to just make loads of houses and take it from there. I'll probably add lots of colourful pieced borders, bright hand quilting, buttons, appliqued trees, flowers & birds etc...
I had a wonderful evening - happily pulling out tonnes of bits of fabric and sewing willy nilly - no measuring or careful cutting whatsoever - fun!!
I just roughly cut the house elements,
Sew into sections,
Straighten edges,
Sew together and square off.
More of my Happy Houses... Harry picking out his favourite house so far.
Monday, 20 September 2010
Felt-tip roll Tutorial
Well - 'tutorial' sounds a bit grand... I was itching to just make something quick, and saw a picture in my book (this one) of a pencil/felt-tip roll, but I wanted a simpler version (and to be honest, I was lost 10 seconds into reading the instructions - I do better with pictures), so came up with this:
I would love to see any that anyone else makes!
Cut 2 pieces of fabic & 1 piece of iron-on interfacing all to the same size. (Mine were about 25'' x 13'' - I just laid out my felt-tips and roughly guessed how big I wanted it.)
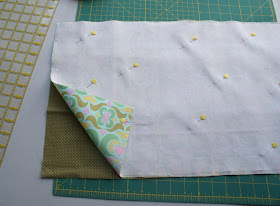
Iron interfacing onto the back of one of the fabric pieces, and put the fabric pieces right-sides together, then pin.
Sew round edges, leaving an opening at a short end. Turn right side out.
Iron the seams out flat, before pulling the whole thing into shape and ironing properly. (This just makes neater edges, and stops the seams from pulling inwards, when you iron the whole thing.)
Fold up the front, and iron. Decide how much of the pencil/felt-tip you want to have sticking out. Put 2 lengths of ribbon in the opening, for tie closes (or you might want matching fabric ties, or just one bit of fabric coming out with velcro on. I was just going for quick, here!)
Open out, pin ribbon in place, and sew all the way round the whole thing.
(This really is no work of art... I'm using up fabric I don't like much, and not sewing especially carefully! I don't think my 4 year old will mind too much. I may make some more attractive ones later on as gifts though!)
Work out roughly were you want the pockets to be, and mark them with pins. (Just try putting in your pencils etc. to see how wide. My pockets were 1.5'' wide, but that's for Berol felt-tips which are quite fat.)
Then sew up and down the rows, making pockets. Just sew across when you get to the top or the bottom of each row, so that all the pockets are made continuously.
Sew a straight line along the bottom of the pockets - sewing over the stitches already there from when you made the pockets. This will ensure all your pencils/felt-tips will sit at the same height as each other.
All done! I think my youngest will be quite happy with it when he gets in from school!
Sunday, 19 September 2010
Blocks Wanted!
I've just made up a couple of Ohio star blocks, after reading on Marguerite's blog about her friend Lizzie who is making up a quilt for a friend of hers who is terminally ill. The post is {here} for anyone who would like to make a block, or has any spare blocks floating around which they would like to donate to the quilt. I think it's a lovely idea.
Friday, 17 September 2010
New Fabric!
The fabrics which I bought from Kerri at Sew Dearly Loved arrived today... hurrah!!
They are a slightly odd assortment - I have no plans whatsoever for them - just liked them!(And some more spots of course)
I've spent yesterday and today cutting out pieces for 2 quilts which I am overseeing the making of at a church activity. They are lap quilts for an old people's home, which we have been visiting. I am supposed to be using scraps & fabrics that have been donated, but am having a hard time making them look nice - I keep adding more of my own fabrics. Still not sure I will like them that much. I may or may not post pictures of them later!
Wednesday, 8 September 2010
Happy Birthday Nan!
It's Scott's Nan's birthday soon, and I made her this card. An unusual colour comination for me - don't think I've used it before.
The challange at Cute Card Thursday is to use fabric, so I used a wide fabric-finish (not shiny-finish) ribbon.
My Aviary Quilt making progress
I finished piecing my Aviary quilt this morning (can you tell that I have finally got round to having a play with photoshop too?!) This is what I started in France before my sewing machine needle broke. I loved the Aviary range of fabric when I first saw it, but could only get hold of a couple of packs of pre-cut triangles in this country, so I decided just to do this simple design. It is alternated with Kona Snow fabric. I'm quite pleased that all the points and corners matched up quite well. I did some careful pinning before sewing seams, and it all went together very easily. I am wondering now if I should put a border of Kona Snow round the outsides, before finishing it. I'm also not sure how I should quilt it. Any ideas? I have got hold of some of the pink fabric to make the binding with.
My one and only baby quilt
Tuesday, 7 September 2010
Quilting Ideas
I have just been updating my other blog, and looking at the pictures reminded me that while in France we visited Suscinio Chateau... Inside, one of the floors really caught my eye - I thought it would make a great pattern for a quilt! The floor is 13th or 14th century. Wonderful how well it has lasted.
Maybe something I shall be working on in the future, anyway.
Monday, 6 September 2010
Well we came (reluctantly) back from France a week ago, but have visited Nottingham and Yorkshire since then, so I have not had much time for crafting... I did have time for some internet fabric shopping though!!
Amongst quite a few other fabrics, I bought this selection - quite funny considering orange and purple are my least favourite colours!