Monday, 30 January 2017

Cards I haven't blogged yet...

I was sorting out my photo files and found some of my cards I hadn't blogged yet:

On this card I used the My Favorite Things Birthday Wishes and Balloons stamp set, and a chipboard cat.  I used a black gloss pen over the stamp, and a sunburst background stamp.

This card for my Brother-in-law uses the Sizzix Framelits Flip-its Circle 4 die set, and a Sizzix/Stampin' Up alphabet die set.

I used Copic pens to colour Purple Onion Design stamps, with Stickles glitter glue accents.

This card is based on a card I saw on Pinterest by Mary Fish. I used the Sizzix Basic Step-ups card for the card base, Tim Holtz's diamond plate embossing folder, and Stampin' Up's Hardwood background stamp. I can't remember who the tool die set is made by.

For this card, I used the Sizzix Circle stand-ups card base for this card, flower punches from Stampin' Up, with Nuvo Apple Green Crystal Drops centres. I used a stamp and teaspoon die from Love and Icecream sets from Reverse Confetti, and an old Sizzix Cupcake die.

I used Diagonal Strip Pretty Panels and Love Note Confetti Cuts from Reverse Confetti, along with Paper Smooches Sentiment Sampler for the stamp, for this card. The butterfly is from Sizzix by Craft Asylum.

My final card used the Evergreen Pivot Card die set for the tree mechanism and tree layers. The stamp is from Purple Onion Design, and the snowflakes are from Sizzix Tim Holtz Mini Paper Snowflakes.

Links to some of the products used:


Tuesday, 24 January 2017

Minc Mini Foil Applicator Gold & Floral Cards

I bought a Minc Mini Foil Applicator a while ago, along with some Minc Reactive gold foil and Minc Toner Paint. I tried them out by sponging the toner paint over some stencils (Tim Holtz Flourish Stencil, and Stampin' Up stencils), letting the paint dry, then running the painted cardstock through the Minc Applicator with some gold foil. I like the beautiful, imperfect, vintagey look that was created (as well as the unbeatable shine!)

Today I got round to finally making some cards with the foiled cardstock backgrounds.

The first card has some layered up Maggie Holmes Open Book flowers, with some droplets of Heidi Swapp Gold Lame Color Shine Spritz. (I also painted some of the Color Shine onto the yellow rose, but it's a bit hard to tell in the pictures.)
I used My Favorite Things Brushstoke Birthday Greetings dies layered over green vellum, for the sentiment.

You can get a slightly better idea of the gorgeous shine here!

The second card uses papers from American Crafts Saturday Collection 6x6 pad, more Maggie Holmes flowers, more Color Shine Spritz, and Nuvo Bubblegum Blush Gloss Crystal Drops.
The larger balloon image I stamped with a Reverse Confetti stamp in black, then scanned it into my computer, resized it, and printed it with a laser toner printer, which the foil adhered to when run through the Minc Mini. I cut it out by hand. The other balloon was cut with a die from the Sizzix Balloons Step-ups die set.

My last card uses similar products. I printed the sentiment in black toner ink on black cardstock, then ran it through the Minc Mini with gold foil. I really love how well the Nuvo Crystal Drops turn out - like much more expensive Enamel Dots.

Product Links:


Friday, 20 January 2017

Sizzix Camper Van & Pop it Ups Birthday Card

I was on a roll today, and made three cards! This was the first. 
This new Sizzix Bigz camper van 'Travel Away' die is why I love Sizzix so much - clean, chunky, fun die cuts! Paired with Karen Burniston's Lucy Label Pop it Ups die set, I think it's the perfect combo!

The 'Make a Wish' banner was cut from the Fine and Dandy paper (see below), and I used Tim Holtz's Handwritten Celebrate die set for the 'Happy Birthday'.
The scalloped border was cut with the On the Edge Scallop die, and the sequin border is from Stampin' Up.

Here's my new haul!
I used American Crafts 'Fine and Dandy' 12x12 pad for all the patterned papers.
The cloud dies are from Papertrey Ink.
I like how the camper van layers up. I die cut two main body pieces, and just cut the bits I needed for behind the windows and the wheels.

Some of the products:


Lawn Fawn 'Happy Mail' Mail Box Flip-its Circle Birthday Card

 Another of my new stash items (see below!) is this 'Happy Mail' mail box die set from Lawn Fawn - I absolutely fell in love with it as soon as I saw it! It's actually quite a simple set because the main body of the box is all one piece.
 I used the Sizzix Circle Flip-its 4 for the card base - another all-time favourite die set.

The papers I used for the mail box and mini envelope are from my new 6x6 paper pad - 'Fabulous' from Authentique. The other papers are older American Crafts ones.
My new stash additions!

I just think this set is so cute!!

Some of the products used:


Pop it Ups Accordion Circle Male Birthday Card

 It feels about three years since I last made a card, but it's been maybe a month. I had a load of fire fighting practical assessments last weekend that I'd been preparing for. 

I want to be super-organised this year, and get all my family and friends' birthday cards and presents ready early, so today I made a start. 
This card uses the Pop it Ups Accordion Circle die set for the card base. I used the main panel die to cut out the patterned paper frames too, just snipping away the central parts.
The Happy Birthday stamp is by Paper Smooches.

I used Heidi Swapp's Sugar Chic 12x12 pad for the papers, and a Dear Lizzy die set for the rosette with ribbons and 'Hooray' banner.

Just because I wasn't making cards, doesn't mean I wasn't keeping an eye out for lovely new products! This is my latest haul... (with some more patterned papers on the way, because I LOVE PAPER!)

I used balloon dies from the Sizzix Balloons Step-Ups Framelits die set, and added my own 'shine' to the balloons.

Some of the products used:


Monday, 26 December 2016

My Christmas Cards 2016 (Sizzix, Elizabeth Craft Design & Stampin' Up)

Merry Christmas everyone! We've had a lovely time (in spite of me having vertigo today and being sick this morning!) I cooked Christmas dinner for 15 of my family yesterday, and were joined later by more of my family, and today there were 16 of us with Scott's family visiting.
Just thought I'd show you the Christmas cards I made this year. Happy to say I made ALL my cards this year, and started early enough that I had time to really enjoy it.
I made probably about 20 more than shown here, in another couple of designs.
Most of the designs here are not my own, but are adaptations of ones I've seen around the internet, so I can't claim any credit for them.

Some of the products used:


Thursday, 8 December 2016

CHALKOLA Chalk Board Marker Pens (Dry Erase Pens) Review


 I was contacted a couple of weeks ago by Chalkola Chalk Markers, asking if I'd like to try some out. Would I like to try out pens??!! Yes please!!  They arrived really quickly via Amazon, and I was sent two packs - the pack of 10 neon 'Party Colours' and the pack of 8 'Earthy Colours'. (Check out a 20% discount code further on in this post, which Chalkola have given me to pass on to you, if you are interested.)
 Between the two packs there is a really lovely range of colours:

The markers come in see-through plastic cases. There is a white marker in each pack, but the rest are different.

Straight out of the pack, the marker tips are not loaded with ink. 

Here's my biggest tip for these markers: Remove the tip while it is still unloaded with ink. The nib has a bullet tip at one end and a chisel tip at the other. Turn the nib around and put it back in the marker, so that the chisel tip is sticking out. To get the nib to fill with ink, you need to shake the marker, then press down the nib around 20-30 times (fewer if you do slower presses). When I was getting the ink through for the first few pens, I did the pressing action on the bullet tip, and it damaged the tips a bit, making them draw with a wider line. (In the colour chart above, you can see the red, orange and yellow lines on the left are all wider and slightly ragged looking.) If you depress the nib by pushing against the long flat edge of the chisel tip, no damage is done. Once the nib is saturated with ink, you can then take the nib out and switch it back to the bullet tip, or leave as a chisel tip.

OK, so with the ink flowing, I got to play! I wrote on paper first, and you can see here just how gorgeous and pigmented the ink is!! The ink is really nice to use on paper, though when dry it will smudge a bit, making a chalky shadow. The markers are highly satisfying to use on paper though, and I imagine little kids would love it.

At this point my teenage daughter arrived home, and quickly grasped the potential of the markers! She grabbed some and headed to the porch where there's lots of glass!

Pretty soon the front of the house was covered with designs! We had brilliant fun!!
When you are covering a large distance quickly, understandably the ink is less intense (as with the sun rays in the picture below, for example). When you take a bit more time, the coverage you get is really good - the ink is highly pigmented (as you can see in the pink and orange flags below).
It was an interesting talking point with a delivery guy, later that day!

We then thought we'd decorate the window directly inside the porch with a Welcome Home layout!

After that, my daughter went crazy with the markers, leaving messages and notes on pretty much every smooth surface in the house!!!

All of our family photos got a make-over:

...and she kindly left messages on all her brothers' windows! (This one to my youngest, who has recently been making some fantastic junk modelling creations: ''This room belongs to the greatest cardboard artist to have ever lived!!!'')

She also tried out the kitchen cabinets!
When I first wiped this off with just a damp cloth, a faint outline still remained, but I was able to get it off completely with a cream cleaner. 
The markers have come off glass absolutely spotlessly and with great ease, but I'd do a small test on other surfaces in a less obvious place first of all, just to double check they won't stain. It may not be entirely obvious if a surface is completely non-porous at first glance, but of course ink will seep into any 'pores'. The ink will come off any non-porous surfaces easily.

The next morning, we had quite an unpleasant surprise, coming down to a large Donald Trump on the dining room windows!! (I live in the UK and am not stating my opinion on American politics - I'd find it equally unpleasant to find a large Hillary on there too!) One of my sons had sneaked down and drawn it after we'd all gone to bed!

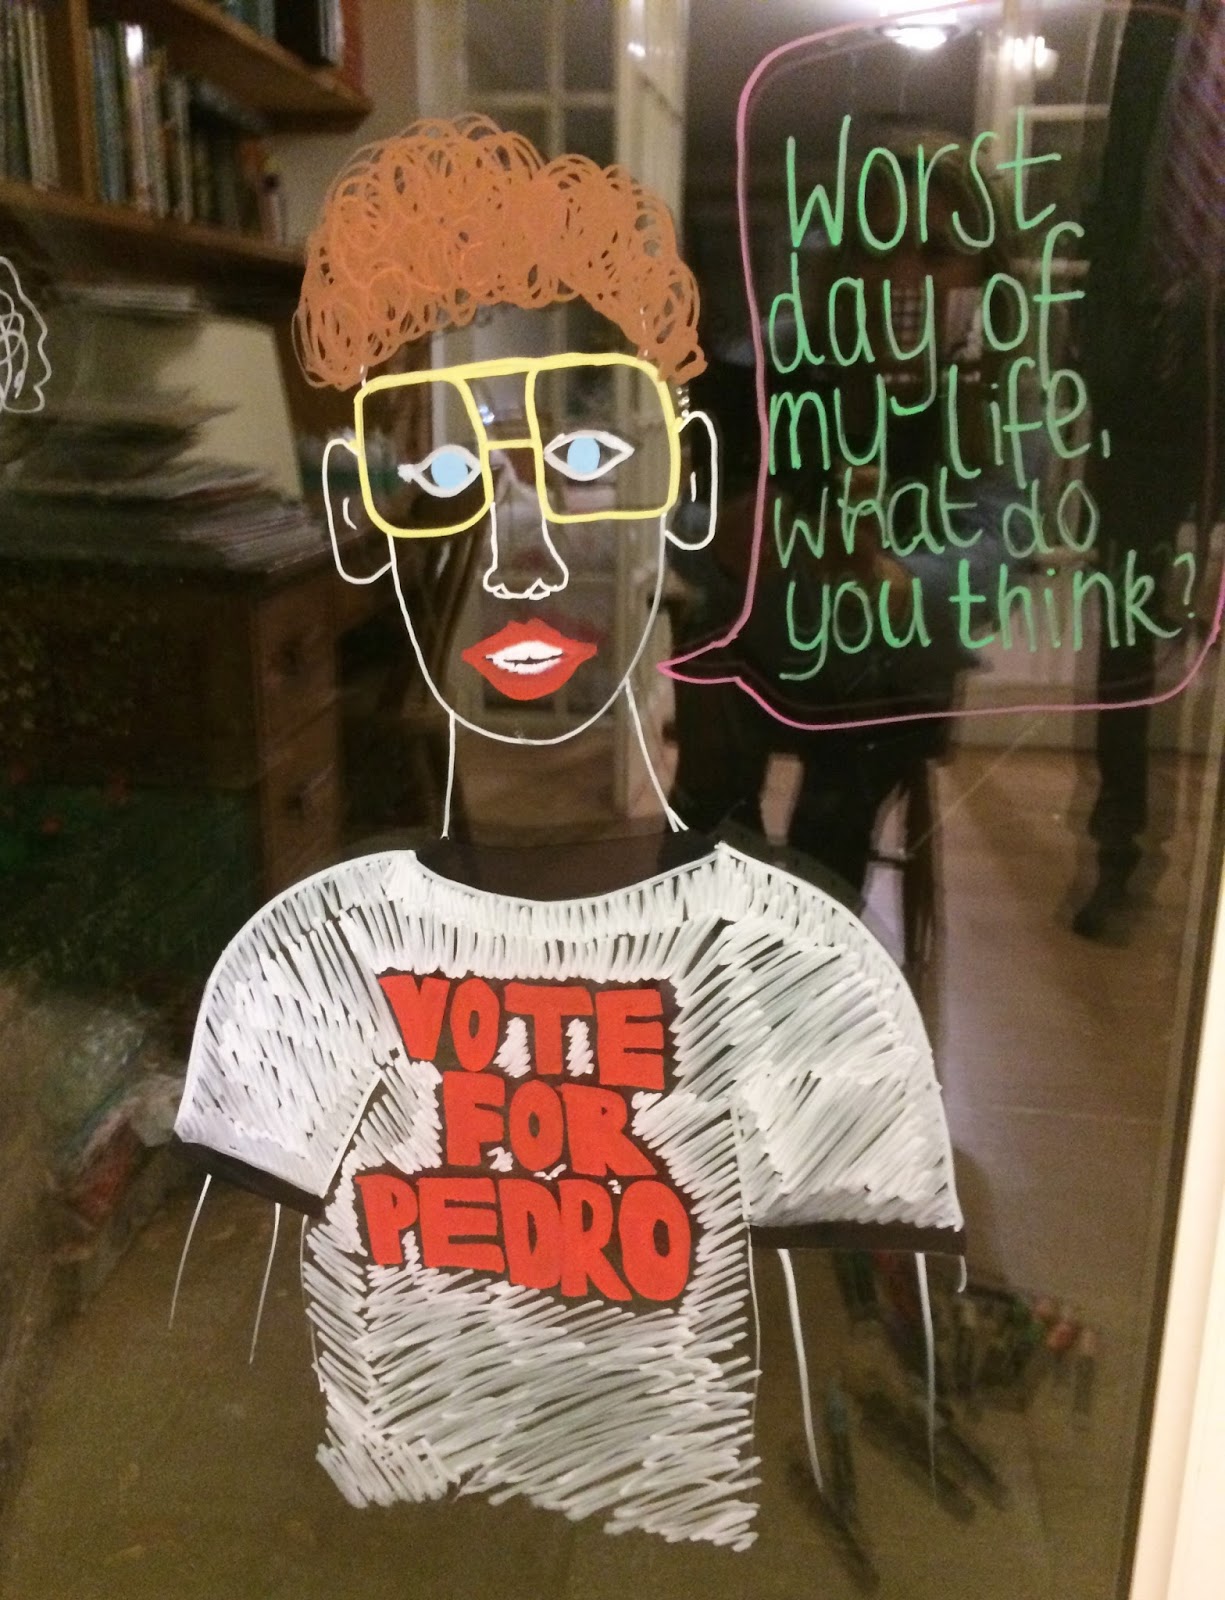
My daughter couldn't tolerate Trump for too long, so he got replaced with Napoleon Dynamite. The day after, Nigel Farage from the UKIP party appeared (courtesy of my son, who thinks this is hilarious!), but suffice to say, Nigel didn't last long either.

You can see again here, how pigmented and opaque the colours are, if you don't rush excessively.
Our dining room gets quite moist air in it from the tumble dryer and cooking, and with it being freezing outside, the windows get condensation on them. The chalk ink lasts pretty well, but when it gets too moist can start to blur and run a bit, if there is a lot of ink in a small area. The single line snowflakes which I drew are still going strong after nearly two weeks though. 

Chakola have kindly given me a 20% discount code to pass onto you. The markers are available via Amazon (links at the top), and you can use this code upon checkout: 20OFFSTR

I don't have experience with any other chalk markers - all I can say is that these Chalkola markers are lovely to use, are vivid and bold, and so much fun! I put some of these pictures on Facebook, and one of my friends commented that I got far better results than she had done with markers of a different brand, so she has bought some Chalkolas now instead.

Finally, I'll just show the picture of the Chalkolas being used on an actual chalk board again (this is a board I made myself with blackboard paint). They work like a dream on chalkboard, and I used a little cream cleaner along with a damp cloth to fully remove it. You might find some other painted chalk boards are more porous than this and have a bit of difficulty erasing them completely - again, do a small test first, if you're not sure how porous a surface is.

I hope that gives you a decent review of Chalkola markers anyway. They get a big thumbs up from the Cryer family!